Advanced User Guide - SangerContig (AB1)
SangerContig is in the intermediate level of sangeranalyseR (Figure_1), and each SangerContig instance corresponds to a contig in a Sanger sequencing experiment. Among its slots, there are two lists, forward and reverse read list, storing SangerRead in the corresponding direction.
In this section, we are going to go through details about a reproducible SangerContig analysis example with the AB1 file input in sangeranalyseR. By running the following example codes, you will get an end-to-end SangerContig analysis result.
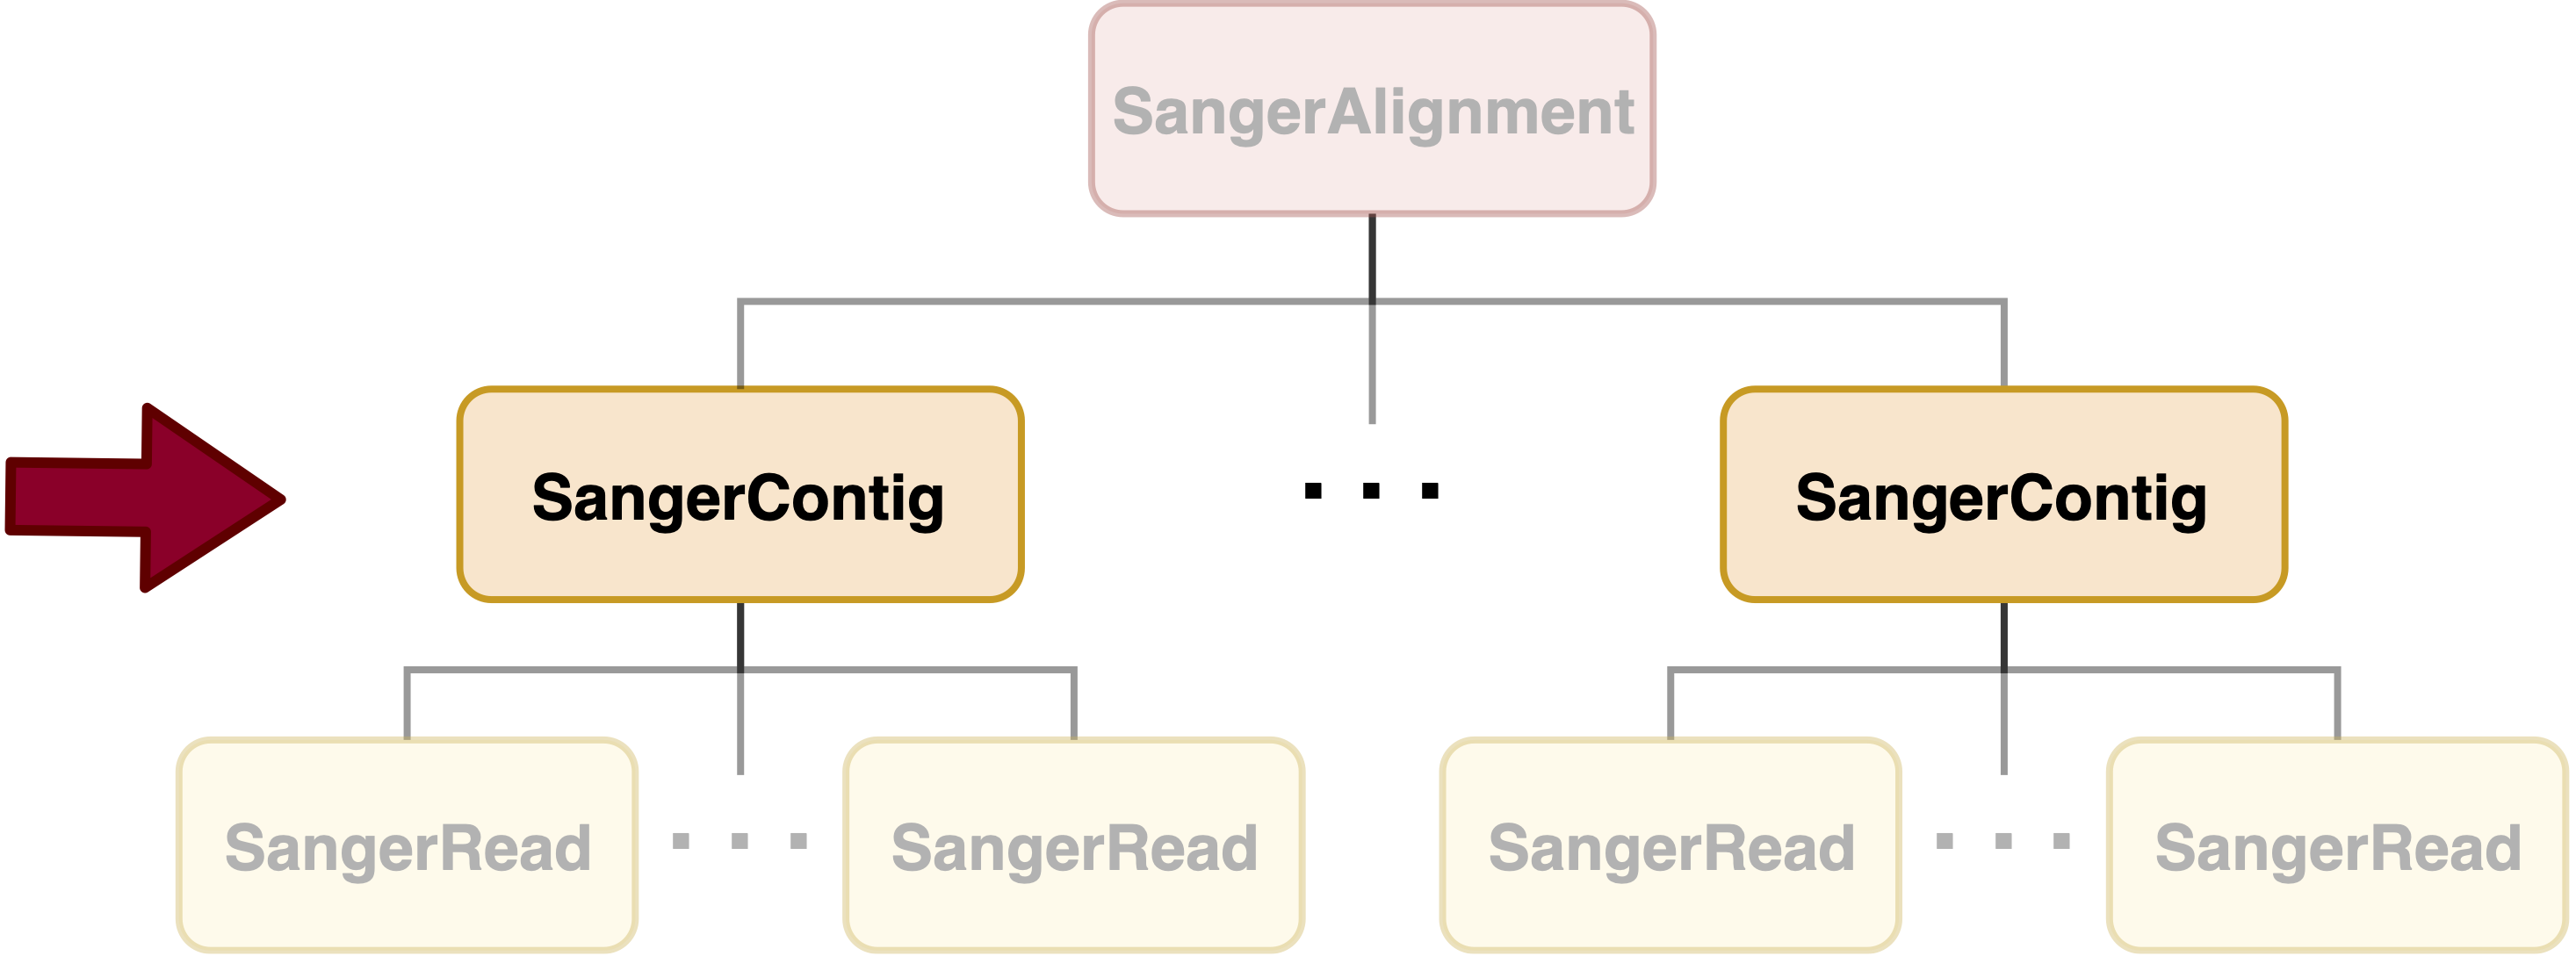
Figure 1. Hierarchy of classes in sangeranalyseR, SangerContig level.
Preparing SangerContig AB1 inputs
The main input file format to create SangerContig instance is AB1. Before starting the analysis, users need to prepare one directory containing all AB1 files, and all of them must be in the first layer of that directory. In other words, there should be no subdirectories. In this example, the data are in the sangeranalyseR package; thus, you can simply get its path by running the following codes:
rawDataDir <- system.file("extdata", package = "sangeranalyseR")
parentDir <- file.path(rawDataDir, "Allolobophora_chlorotica", "RBNII")
The value of parentDir is where all AB1 files are placed. If your operating system is macOS, then its value should look like this:
And we showed the files under parentDir in Figure_2:
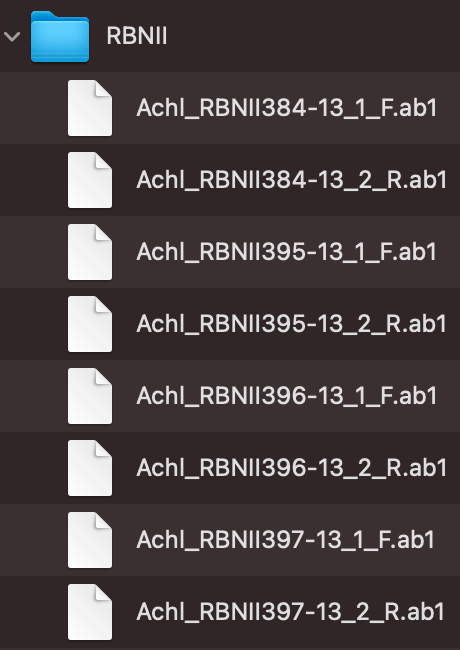
Figure 2. SangerContig filename regulation.
Figure_2 shows the file-naming regulation and hierarchy. In this example, RBNII is the parent directory, and all AB1 files must be under its first layer. There are two ways for users to group their AB1 files which are “regular expression matching” and “CSV file matching”, and following are instructions of how to prepare and name your AB1 input files.
(1) “regular expression matching” SangerContig inputs (AB1)
For regular expression matching method, sangeranalyseR will group AB1 files based on their contig names and read directions in their filenames automatically; therefore, users have to follow the file-naming regulations below:
Note
- All input files must have .ab1 as its file extension
- All input files must have the same contig name in their filenames.
- Forward or reverse direction has to be specified in the filename.
There are four parameters, ABIF_Directory, contigName, REGEX_SuffixForward, and REGEX_SuffixReverse, that define the grouping rule to let sangeranalyseR automatically match correct AB1 files and divide them into forward and reverse directions.
Note
ABIF_Directory: this is the directory that contains all AB1 files, and it can be either an absolute or relative path. We suggest users to put only target AB1 files inside this directory and do not include any other unrelated files.contigName: this is a regular expression that matches filenames that are going to be included in the SangerContig analysis.greplfunction in R is used.REGEX_SuffixForward: this is a regular expression that matches all filenames in forward direction.greplfunction in R is used.REGEX_SuffixReverse: this is a regular expression that matches all filenames in reverse direction.greplfunction in R is used.
If you don’t know what regular expression is, don’t panic - it’s just a way of recognising text. Please refer to What is a regular expression? for more details. Here is an example of how it works in sangeranalseR:
So how sangeranalyseR works is that it first matches the contigName to exclude unrelated files and then separate the forward and reverse reads by matching REGEX_SuffixForward and REGEX_SuffixReverse. Therefore, it is important to make sure that all target AB1 files share the same contigName and carefully select your REGEX_SuffixForward and REGEX_SuffixReverse. The bad file-naming and wrong regex matching might accidentally include reverse reads into the forward read list or vice versa, which will make the program generate wrong results. Therefore, it is important to have a consistent naming strategy. So, how should we systematically name AB1 files? We suggest users to follow the file-naming regulation in Figure_3.

Figure 3. Suggested AB1 file-naming regulation - SangerContig.
As you can see, the first part of the regulation is a consensus read name (or contig name), which narrows down the scope of AB1 files to those we are going to examine. The second part of the regulation is an index. Since there might be more than one read that is in the forward or reverse direction, we recommend you to number your reads in the same contig group. The third part is a direction which is either ‘F’ (forward) or ‘R’ (reverse). Last but not least, files have to end with .ab1 file extension.
To make it more specific, let’s go back to the true example. In Figure_2, there are a lot of AB1 files from different contigs in RBNII (ABIF_Directory).
First, we set contigName to "Achl_RBNII384-13" to reduce candidates from eight to two AB1 files, Achl_RBNII384-13_1_F.ab1 and Achl_RBNII384-13_2_R.ab1. Then, we set REGEX_SuffixForward to "_[0-9]*_F.ab1$" and REGEX_SuffixReverse to "_[0-9]*_R.ab1$" to let sangeranalyseR match and group forward and reverse reads automatically. By the regular expression rule, Achl_RBNII384-13_1_F.ab1 and Achl_RBNII384-13_2_R.ab1 will be categorized into “forward read list” and “reverse read list” respectively. The reason why we strongly recommend you to follow this file-naming regulation is that by doing so, you can directly adopt the example regular expression matching values, "_[0-9]*_F.ab1$" and "_[0-9]*_R.ab1$", to group reads and reduce chances of error.
After understanding how parameters work, please refer to Creating SangerContig instance from AB1 below to see how sangeranalseR creates ‘Achl_RBNII384-13’ SangerContig instance.
(2) “CSV file matching” SangerContig inputs (AB1)
For those who are not familiar with regular expression, we provide a second grouping approach, CSV file matching method. sangeranalyseR will group AB1 files based on the information in a CSV file automatically; therefore, users have to follow the regulations below:
Note
Here is an example CSV file (Figure_4)

Figure 4. Example CSV file for SangerContig instance creation.
- There must be three columns, “reads”, “direction”, and “contig”, in the CSV file.
- The “reads” column stores the filename of AB1 files that are going to be included in the analysis.
- The “direction” column stores the direction of the reads. It must be “F” (forward) or “R” (reverse).
- The “contig” column stores the contig name that each read blongs. Reads in the same contig have to have the same contig name, and they will be grouped into the same SangerContig instance.
There are three parameters, ABIF_Directory, contigName, and CSV_NamesConversion,that define the grouping rule to help sangeranalseR to automatically match correct AB1 files and divide them into forward and reverse directions.
Note
ABIF_Directory: this is the directory that contains all AB1 files, and it can be either an absolute or relative path. We suggest users to put only target AB1 files inside this directory and do not include any other unrelated files.contigName: this is a regular expression that matches filenames that are going to be included in the SangerContig analysis.greplfunction in R is used.CSV_NamesConversion: this is the path to the CSV file. It can be either an absolute or relative path.
The main difference between “CSV file matching” and “regular expression matching” is where the grouping rule is written. For “regular expression matching”, rules are writtein in filenames, and thus more naming requirements are required. In contrast, rules of “CSV file matching” are written in an additional CSV file so it is more flexible on AB1 file-naming.
So how sangeranalyseR works is that it first reads in the CSV file (with “reads”, “direction”, and “contig” columns), filter out rows whose “contig” is not the value of contigName parameter, find the names of AB1 files listed in “reads”, and assign directions to them based on “direction”.
To make it more specific, let’s go back to the true example. First, we prepare a CSV file (CSV_NamesConversion) and a file directory like Figure_2 (ABIF_Directory) with some AB1 files from different contigs. In the CSV file, both rows have the contig name "Achl_RBNII384-13", which is what we need to assign to the contigName parameter. sangeranalyseR then checks and matches “reads” of these two rows, "Achl_RBNII384-13_1_F.ab1" and "Achl_RBNII384-13_2_R.ab1", in RBNII directory and reduce candidates from eight to two AB1 files. Last, these two reads are assigned into “forward read list” and “reverse read list” respectively by the “direction” column.
After understanding how parameters work, please refer to Creating SangerContig instance from AB1 below to see how sangeranalseR creates ‘Achl_RBNII384-13’ SangerContig instance.
Creating SangerContig instance from AB1
After preparing the input directory, we can create a SangerContig instance by running SangerContig constructor function or new method. The constructor function is a wrapper for new method and it makes instance creation more intuitive. Their input parameters are same, and all of them have their default values. For more details about SangerContig inputs and slots definition, please refer to sangeranalyseR reference manual. We will explain two SangerContig instance creation methods, “regular expression matching” and “CSV file matching”.
(1) “regular expression matching” SangerContig creation (AB1)
The consturctor function and new method below contain four parameters, ABIF_Directory, contigName, REGEX_SuffixForward, and REGEX_SuffixReverse, that we mentioned in the previous section. It also includes important parameters like quality trimming, chromatogram visualization, consensus alignment, and so on. Run the following code and create my_sangerContig instance.
# using `constructor` function to create SangerContig instance
my_sangerContig <- SangerContig(inputSource           = "ABIF",
                                processMethod         = "REGEX",
                                ABIF_Directory        = parentDir,
                                contigName            = "Achl_RBNII384-13",
                                REGEX_SuffixForward   = "_[0-9]*_F.ab1$",
                                REGEX_SuffixReverse   = "_[0-9]*_R.ab1$",
                                TrimmingMethod        = "M1",
                                M1TrimmingCutoff      = 0.0001,
                                M2CutoffQualityScore  = NULL,
                                M2SlidingWindowSize   = NULL,
                                baseNumPerRow         = 100,
                                heightPerRow          = 200,
                                signalRatioCutoff     = 0.33,
                                showTrimmed           = TRUE,
                                refAminoAcidSeq       = "SRQWLFSTNHKDIGTLYFIFGAWAGMVGTSLSILIRAELGHPGALIGDDQIYNVIVTAHAFIMIFFMVMPIMIGGFGNWLVPLMLGAPDMAFPRMNNMSFWLLPPALSLLLVSSMVENGAGTGWTVYPPLSAGIAHGGASVDLAIFSLHLAGISSILGAVNFITTVINMRSTGISLDRMPLFVWSVVITALLLLLSLPVLAGAITMLLTDRNLNTSFFDPAGGGDPILYQHLFWFFGHPEVYILILPGFGMISHIISQESGKKETFGSLGMIYAMLAIGLLGFIVWAHHMFTVGMDVDTRAYFTSATMIIAVPTGIKIFSWLATLHGTQLSYSPAILWALGFVFLFTVGGLTGVVLANSSVDIILHDTYYVVAHFHYVLSMGAVFAIMAGFIHWYPLFTGLTLNNKWLKSHFIIMFIGVNLTFFPQHFLGLAGMPRRYSDYPDAYTTWNIVSTIGSTISLLGILFFFFIIWESLVSQRQVIYPIQLNSSIEWYQNTPPAEHSYSELPLLTN",
                                minReadsNum           = 2,
                                minReadLength         = 20,
                                minFractionCall       = 0.5,
                                maxFractionLost       = 0.5,
                                geneticCode           = GENETIC_CODE,
                                acceptStopCodons      = TRUE,
                                readingFrame          = 1,
                                processorsNum         = 1)

# using `new` method to create SangerContig instance
my_sangerContig <- new("SangerContig",
                       inputSource           = "ABIF",
                       processMethod         = "REGEX",
                       ABIF_Directory        = parentDir,
                       contigName            = "Achl_RBNII384-13",
                       REGEX_SuffixForward   = "_[0-9]*_F.ab1$",
                       REGEX_SuffixReverse   = "_[0-9]*_R.ab1$",
                       TrimmingMethod        = "M1",
                       M1TrimmingCutoff      = 0.0001,
                       M2CutoffQualityScore  = NULL,
                       M2SlidingWindowSize   = NULL,
                       baseNumPerRow         = 100,
                       heightPerRow          = 200,
                       signalRatioCutoff     = 0.33,
                       showTrimmed           = TRUE,
                       refAminoAcidSeq       = "SRQWLFSTNHKDIGTLYFIFGAWAGMVGTSLSILIRAELGHPGALIGDDQIYNVIVTAHAFIMIFFMVMPIMIGGFGNWLVPLMLGAPDMAFPRMNNMSFWLLPPALSLLLVSSMVENGAGTGWTVYPPLSAGIAHGGASVDLAIFSLHLAGISSILGAVNFITTVINMRSTGISLDRMPLFVWSVVITALLLLLSLPVLAGAITMLLTDRNLNTSFFDPAGGGDPILYQHLFWFFGHPEVYILILPGFGMISHIISQESGKKETFGSLGMIYAMLAIGLLGFIVWAHHMFTVGMDVDTRAYFTSATMIIAVPTGIKIFSWLATLHGTQLSYSPAILWALGFVFLFTVGGLTGVVLANSSVDIILHDTYYVVAHFHYVLSMGAVFAIMAGFIHWYPLFTGLTLNNKWLKSHFIIMFIGVNLTFFPQHFLGLAGMPRRYSDYPDAYTTWNIVSTIGSTISLLGILFFFFIIWESLVSQRQVIYPIQLNSSIEWYQNTPPAEHSYSELPLLTN",
                       minReadsNum           = 2,
                       minReadLength         = 20,
                       minFractionCall       = 0.5,
                       maxFractionLost       = 0.5,
                       geneticCode           = GENETIC_CODE,
                       acceptStopCodons      = TRUE,
                       readingFrame          = 1,
                       processorsNum         = 1)
In this example, contigName is set to Achl_RBNII384-13, so only Achl_RBNII384-13_1_F.ab1 and Achl_RBNII384-13_2_R.ab1 are selected. Moreover, by regular expression pattern matching, Achl_RBNII384-13_1_F.ab1 is categorized into the forward list, and Achl_RBNII384-13_2_R.ab1 is categorized into the reverse read. Both reads are aligned into a contig, my_sangerContig, and it will be used as the input for the following functions.
Inside the R shell, you can run my_sangerContig to get basic information of the instance or run my_sangerContig@objectResults@readResultTable to check the creation result of every Sanger read after my_sangerContig is successfully created.
Here is the output of my_sangerContig:
SangerContig S4 instance
         Input Source :  ABIF
         Process Method :  REGEX
         ABIF Directory :  /Library/Frameworks/R.framework/Versions/4.0/Resources/library/sangeranalyseR/extdata/Allolobophora_chlorotica/RBNII
   REGEX Suffix Forward :  _[0-9]*_F.ab1$
   REGEX Suffix Reverse :  _[0-9]*_R.ab1$
            Contig Name :  Achl_RBNII384-13
         'minReadsNum' :  2
      'minReadLength' :  20
      'minFractionCall' :  0.5
      'maxFractionLost' :  0.5
   'acceptStopCodons' :  TRUE
         'readingFrame' :  1
      Contig Sequence :  AGCAGGATAGTAGGGGCTGGTATAAGACTCCTAATTCGAATTGAGCTAAGACAGCCGGGAGCATTTCTAGGAAGGGATCAACTCTATAACACTATTGTAACTGCTCACGCATTTGTAATAATTTTCTTTCTAGTAATACCTGTATTTATTGGGGGGTTCGGTAATTGACTTCTACCTTTAATACTTGGAGCCCCTGACATGGCATTCCCACGTCTTAACAACATAAGATTTTGACTCCTTCCCCCATCACTAATCCTTCTAGTATCCTCTGCTGCAGTAGAAAAGGGTGCGGGAACTGGATGAACTGTTTATCCACCCCTAGCAAGAAACATTGCTCATGCCGGCCCATCTGTAGACTTAGCTATTTTTTCTCTTCATTTAGCAGGTGCTTCATCAATCTTGGGTGCCATTAATTTTATTACTACTGTTATTAACATACGATGAAGAGGCTTACGACTTGAACGAATCCCATTATTCGTTTGAGCCGTACTAATTACAGTGGTCCTTCTACTCTTATCTTTACCAGTATTAGCCGGTGCAATTACTATACTACTTACCGATCGAAATCTAAATACCTCCTTCTTTGACCCTGCTGGAGGCGGAGAT
Forward reads in the contig >>  1
Reverse reads in the contig >>  1
SUCCESS [2021-12-07 17:01:18] 'Achl_RBNII384-13' is successfully created!
Here is the output of my_sangerContig@objectResults@readResultTable:
                  readName creationResult errorType errorMessage inputSource    direction
1 Achl_RBNII384-13_1_F.ab1           TRUE      None         None        ABIF Forward Read
2 Achl_RBNII384-13_2_R.ab1           TRUE      None         None        ABIF Reverse Read
(2) “CSV file matching” SangerContig creation (AB1)
The consturctor function and new method below contain three parameters, ABIF_Directory, contigName, and CSV_NamesConversion, that we mentioned in the previous section. It also includes important parameters like quality trimming, chromatogram visualization, consensus alignment, and so on. Run the following code and create my_sangerContig instance.
csv_namesConversion <- file.path(rawDataDir, "ab1", "SangerContig", "names_conversion_2.csv")

# using `constructor` function to create SangerContig instance
my_sangerContig <- SangerContig(inputSource            = "ABIF",
                                processMethod          = "CSV",
                                ABIF_Directory         = parentDir,
                                contigName             = "Achl_RBNII384-13",
                                CSV_NamesConversion    = csv_namesConversion,
                                TrimmingMethod         = "M1",
                                M1TrimmingCutoff       = 0.0001,
                                M2CutoffQualityScore   = NULL,
                                M2SlidingWindowSize    = NULL,
                                baseNumPerRow          = 100,
                                heightPerRow           = 200,
                                signalRatioCutoff      = 0.33,
                                showTrimmed            = TRUE,
                                refAminoAcidSeq        = "SRQWLFSTNHKDIGTLYFIFGAWAGMVGTSLSILIRAELGHPGALIGDDQIYNVIVTAHAFIMIFFMVMPIMIGGFGNWLVPLMLGAPDMAFPRMNNMSFWLLPPALSLLLVSSMVENGAGTGWTVYPPLSAGIAHGGASVDLAIFSLHLAGISSILGAVNFITTVINMRSTGISLDRMPLFVWSVVITALLLLLSLPVLAGAITMLLTDRNLNTSFFDPAGGGDPILYQHLFWFFGHPEVYILILPGFGMISHIISQESGKKETFGSLGMIYAMLAIGLLGFIVWAHHMFTVGMDVDTRAYFTSATMIIAVPTGIKIFSWLATLHGTQLSYSPAILWALGFVFLFTVGGLTGVVLANSSVDIILHDTYYVVAHFHYVLSMGAVFAIMAGFIHWYPLFTGLTLNNKWLKSHFIIMFIGVNLTFFPQHFLGLAGMPRRYSDYPDAYTTWNIVSTIGSTISLLGILFFFFIIWESLVSQRQVIYPIQLNSSIEWYQNTPPAEHSYSELPLLTN",
                                minReadsNum            = 2,
                                minReadLength          = 20,
                                minFractionCall        = 0.5,
                                maxFractionLost        = 0.5,
                                geneticCode            = GENETIC_CODE,
                                acceptStopCodons       = TRUE,
                                readingFrame           = 1,
                                processorsNum          = 1)


# using `new` method to create SangerContig instance
my_sangerContig <- new("SangerContig",
                       inputSource           = "ABIF",
                       processMethod         = "CSV",
                       ABIF_Directory        = parentDir,
                       contigName            = "Achl_RBNII384-13",
                       CSV_NamesConversion   = csv_namesConversion,
                       TrimmingMethod         = "M1",
                       M1TrimmingCutoff       = 0.0001,
                       M2CutoffQualityScore   = NULL,
                       M2SlidingWindowSize    = NULL,
                       baseNumPerRow          = 100,
                       heightPerRow           = 200,
                       signalRatioCutoff      = 0.33,
                       showTrimmed            = TRUE,
                       refAminoAcidSeq = "SRQWLFSTNHKDIGTLYFIFGAWAGMVGTSLSILIRAELGHPGALIGDDQIYNVIVTAHAFIMIFFMVMPIMIGGFGNWLVPLMLGAPDMAFPRMNNMSFWLLPPALSLLLVSSMVENGAGTGWTVYPPLSAGIAHGGASVDLAIFSLHLAGISSILGAVNFITTVINMRSTGISLDRMPLFVWSVVITALLLLLSLPVLAGAITMLLTDRNLNTSFFDPAGGGDPILYQHLFWFFGHPEVYILILPGFGMISHIISQESGKKETFGSLGMIYAMLAIGLLGFIVWAHHMFTVGMDVDTRAYFTSATMIIAVPTGIKIFSWLATLHGTQLSYSPAILWALGFVFLFTVGGLTGVVLANSSVDIILHDTYYVVAHFHYVLSMGAVFAIMAGFIHWYPLFTGLTLNNKWLKSHFIIMFIGVNLTFFPQHFLGLAGMPRRYSDYPDAYTTWNIVSTIGSTISLLGILFFFFIIWESLVSQRQVIYPIQLNSSIEWYQNTPPAEHSYSELPLLTN",
                       minReadsNum            = 2,
                       minReadLength          = 20,
                       minFractionCall        = 0.5,
                       maxFractionLost        = 0.5,
                       geneticCode            = GENETIC_CODE,
                       acceptStopCodons       = TRUE,
                       readingFrame           = 1,
                       processorsNum          = 1)
First, you need to load the CSV file into the R environment. If you are still don’t know how to prepare it, please check (2) “CSV file matching” SangerContig inputs (AB1). Then, it will follow rules in the CSV file and create my_sangerContig. After it’s created, inside the R shell, you can run my_sangerContig to get basic information of the instance or run my_sangerContig@objectResults@readResultTable to check the creation result of every Sanger read after my_sangerContig is successfully created.
Here is the output of my_sangerContig:
SangerContig S4 instance
         Input Source :  ABIF
         Process Method :  CSV
         ABIF Directory :  /Library/Frameworks/R.framework/Versions/4.0/Resources/library/sangeranalyseR/extdata/Allolobophora_chlorotica/RBNII
   CSV Names Conversion :  /Library/Frameworks/R.framework/Versions/4.0/Resources/library/sangeranalyseR/extdata/ab1/SangerContig/names_conversion_2.csv
            Contig Name :  Achl_RBNII384-13
         'minReadsNum' :  2
      'minReadLength' :  20
      'minFractionCall' :  0.5
      'maxFractionLost' :  0.5
   'acceptStopCodons' :  TRUE
         'readingFrame' :  1
      Contig Sequence :  AGCAGGATAGTAGGGGCTGGTATAAGACTCCTAATTCGAATTGAGCTAAGACAGCCGGGAGCATTTCTAGGAAGGGATCAACTCTATAACACTATTGTAACTGCTCACGCATTTGTAATAATTTTCTTTCTAGTAATACCTGTATTTATTGGGGGGTTCGGTAATTGACTTCTACCTTTAATACTTGGAGCCCCTGACATGGCATTCCCACGTCTTAACAACATAAGATTTTGACTCCTTCCCCCATCACTAATCCTTCTAGTATCCTCTGCTGCAGTAGAAAAGGGTGCGGGAACTGGATGAACTGTTTATCCACCCCTAGCAAGAAACATTGCTCATGCCGGCCCATCTGTAGACTTAGCTATTTTTTCTCTTCATTTAGCAGGTGCTTCATCAATCTTGGGTGCCATTAATTTTATTACTACTGTTATTAACATACGATGAAGAGGCTTACGACTTGAACGAATCCCATTATTCGTTTGAGCCGTACTAATTACAGTGGTCCTTCTACTCTTATCTTTACCAGTATTAGCCGGTGCAATTACTATACTACTTACCGATCGAAATCTAAATACCTCCTTCTTTGACCCTGCTGGAGGCGGAGAT
Forward reads in the contig >>  1
Reverse reads in the contig >>  1
SUCCESS [2021-12-07 17:11:48] 'Achl_RBNII384-13' is successfully created!
Here is the output of my_sangerContig@objectResults@readResultTable:
                  readName creationResult errorType errorMessage inputSource    direction
1 Achl_RBNII384-13_1_F.ab1           TRUE      None         None        ABIF Forward Read
2 Achl_RBNII384-13_2_R.ab1           TRUE      None         None        ABIF Reverse Read
Updating SangerContig quality trimming parameters
In the previous Creating SangerContig instance from AB1 part, the constructor function will apply the quality trimming parameters to all reads. After creating a SangerContig instance, users can change the trimming parameters by running updateQualityParam function which will update all reads with the new trimming parameters and redo reads alignment. If users want to do quality trimming read by read instead of all at once, please move on to the next section, Launching SangerContig Shiny app page.
newSangerContig <- updateQualityParam(my_sangerContig,
                                      TrimmingMethod       = "M2",
                                      M1TrimmingCutoff     = NULL,
                                      M2CutoffQualityScore = 20,
                                      M2SlidingWindowSize  = 15)
Launching SangerContig Shiny app
We create an interactive local Shiny app for users to go into each SangerRead in SangerContig instance. Users only need to run one function, launchApp, with previously created instance as input and the SangerContig Shiny app will pop up. Here, we will go through SangerRead and SangerContig pages.
launchApp(my_sangerContig)
SangerContig page (SC app)
SangerContig page is the initial page of SangerContig Shiny app. Figure 5 shows the overview page of the contig. Notice that there is a red “Re-calculate Contig” button. Users need to click the button after changing the quality trimming parameters in order to get the updated information. In SangerContig page, there are two expendable tabs, “Forward Reads” and “Reverse Reads” storing the corresponding reads on the left-hand side navigation panel in Figure 5. See SangerRead page (SC app) for more details of the subpage.
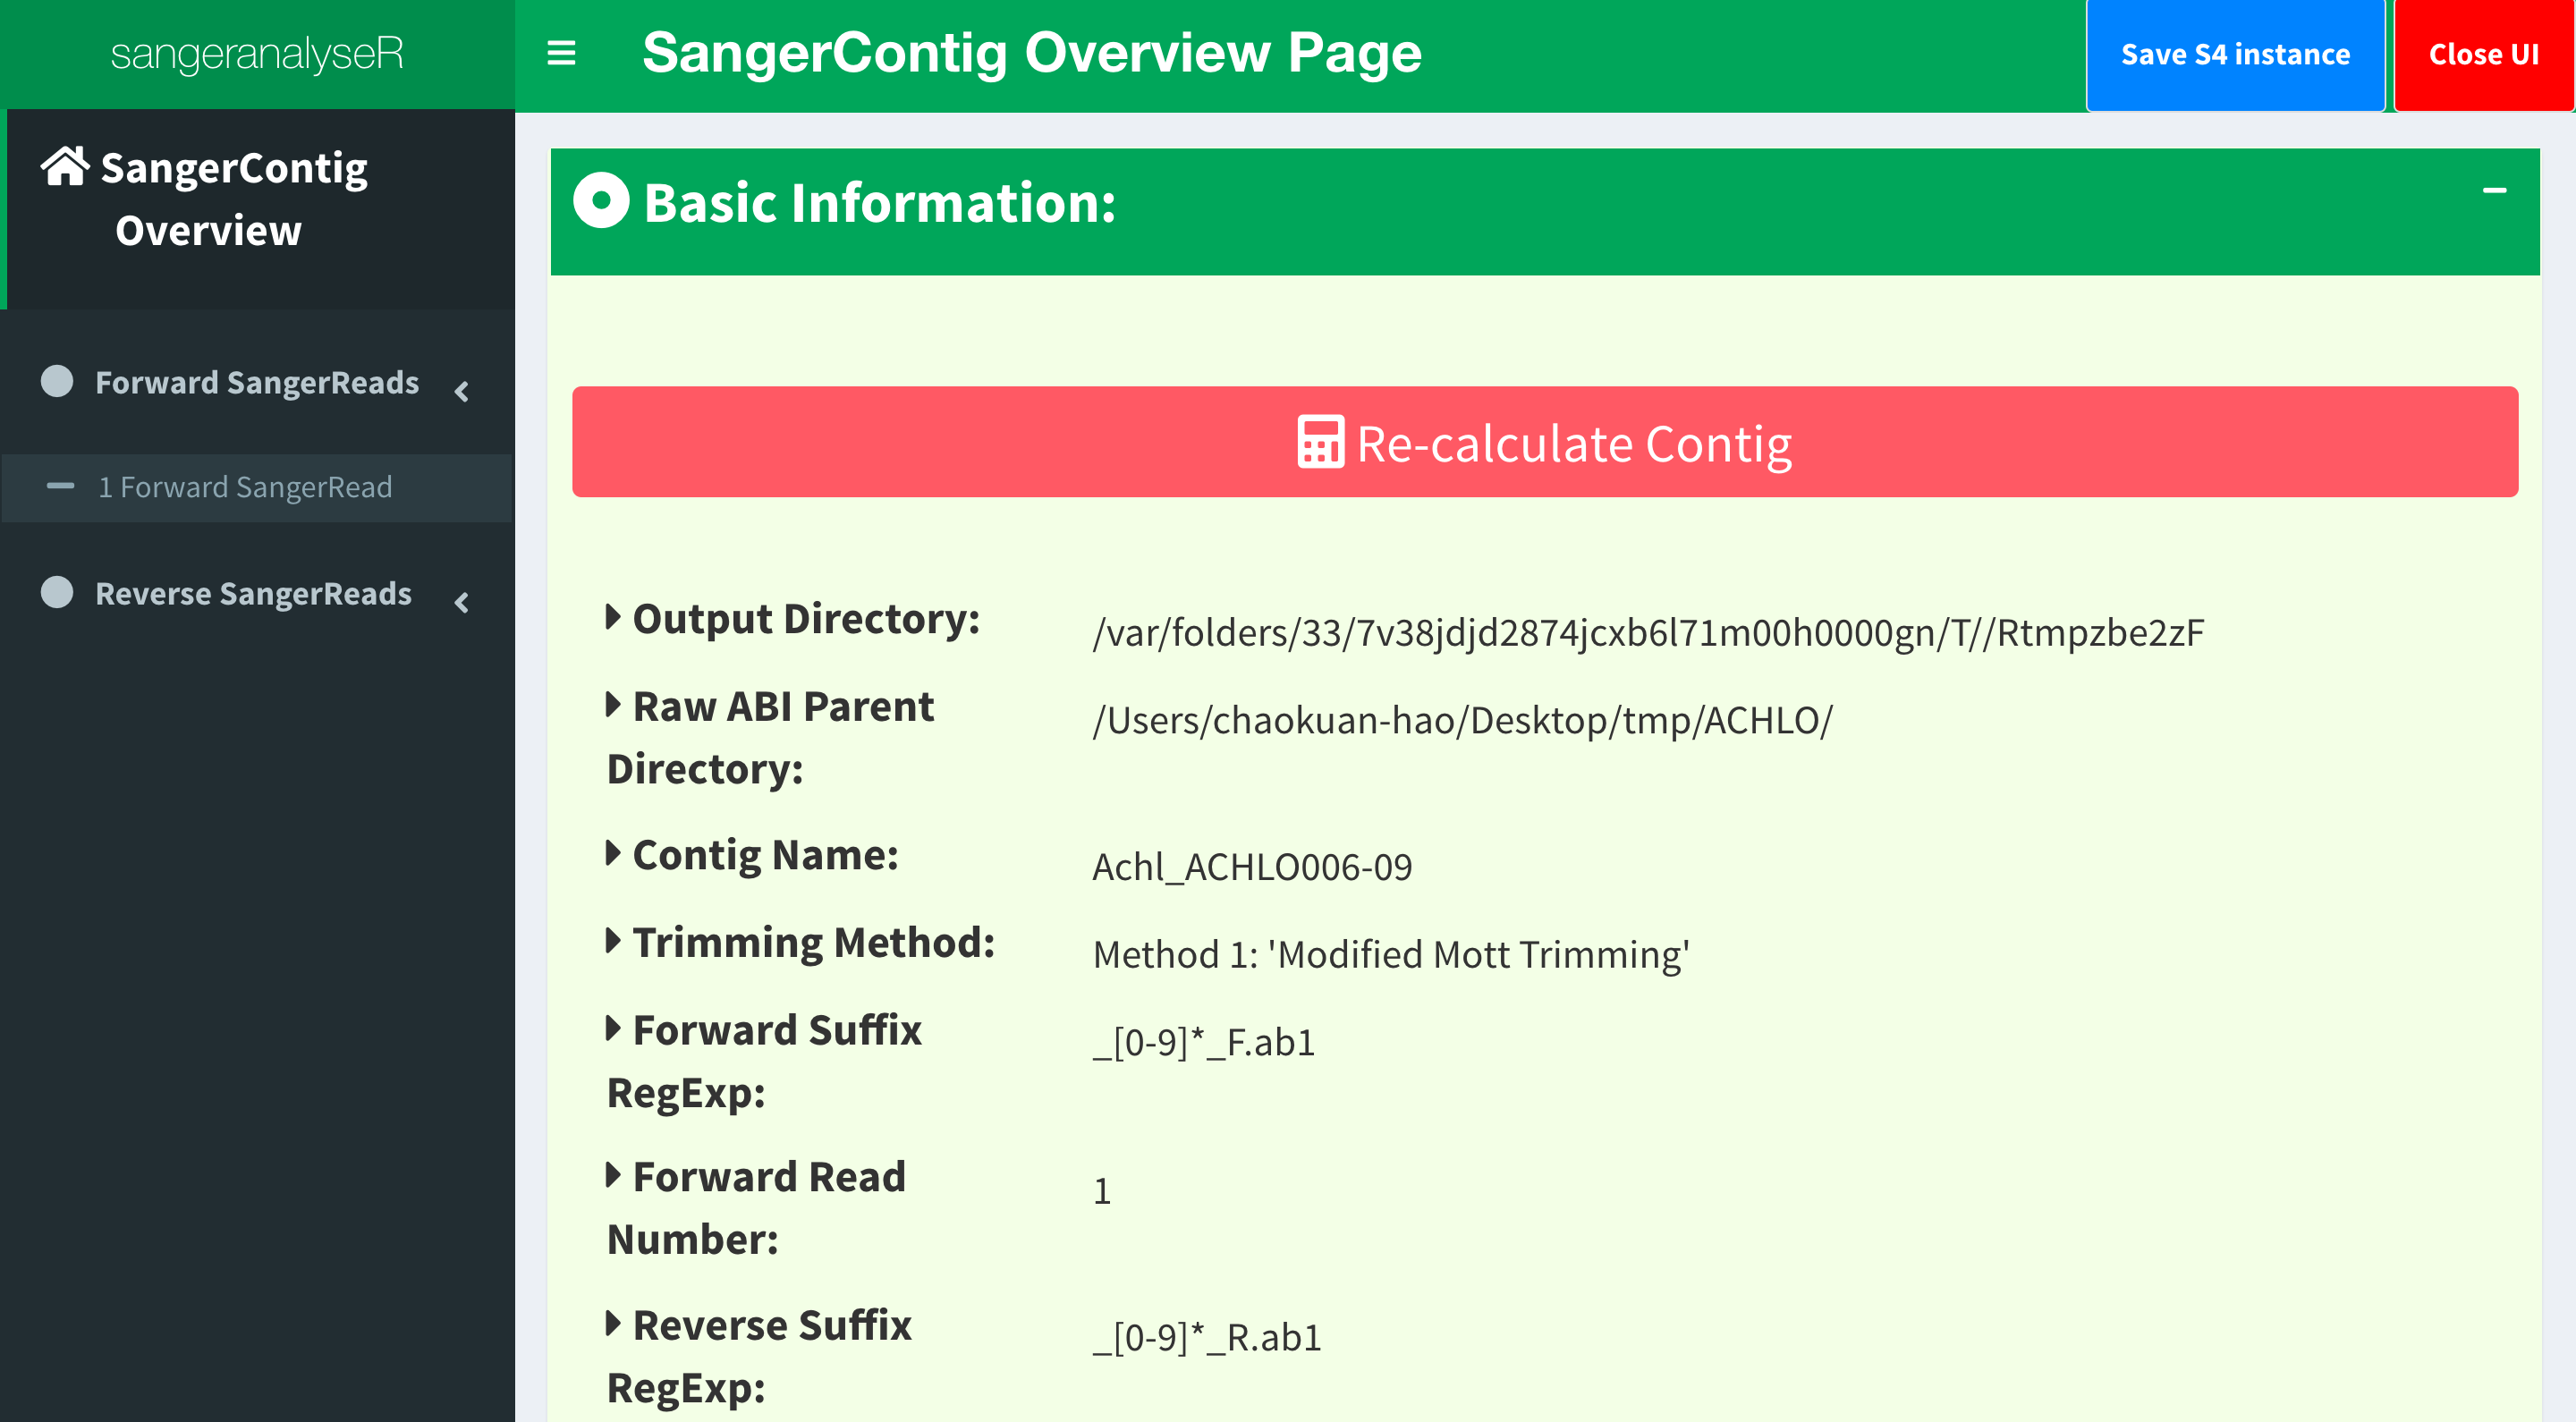
Figure 5. SangerContig Shiny app initial page - SangerContig page.
The information provided in this page are input parameters and contig results including “genetic code table”, “reference amino acid sequence”, “reads alignment”, “difference data frame”, “dendrogram”, “sample distance heatmap”, “indels data frame”, and “stop codons data frame”.
Figure 6 shows reads alignment result and difference data frame. The alignment is generated by AlignSeqs or AlignTranslation function in DECIPHER package.
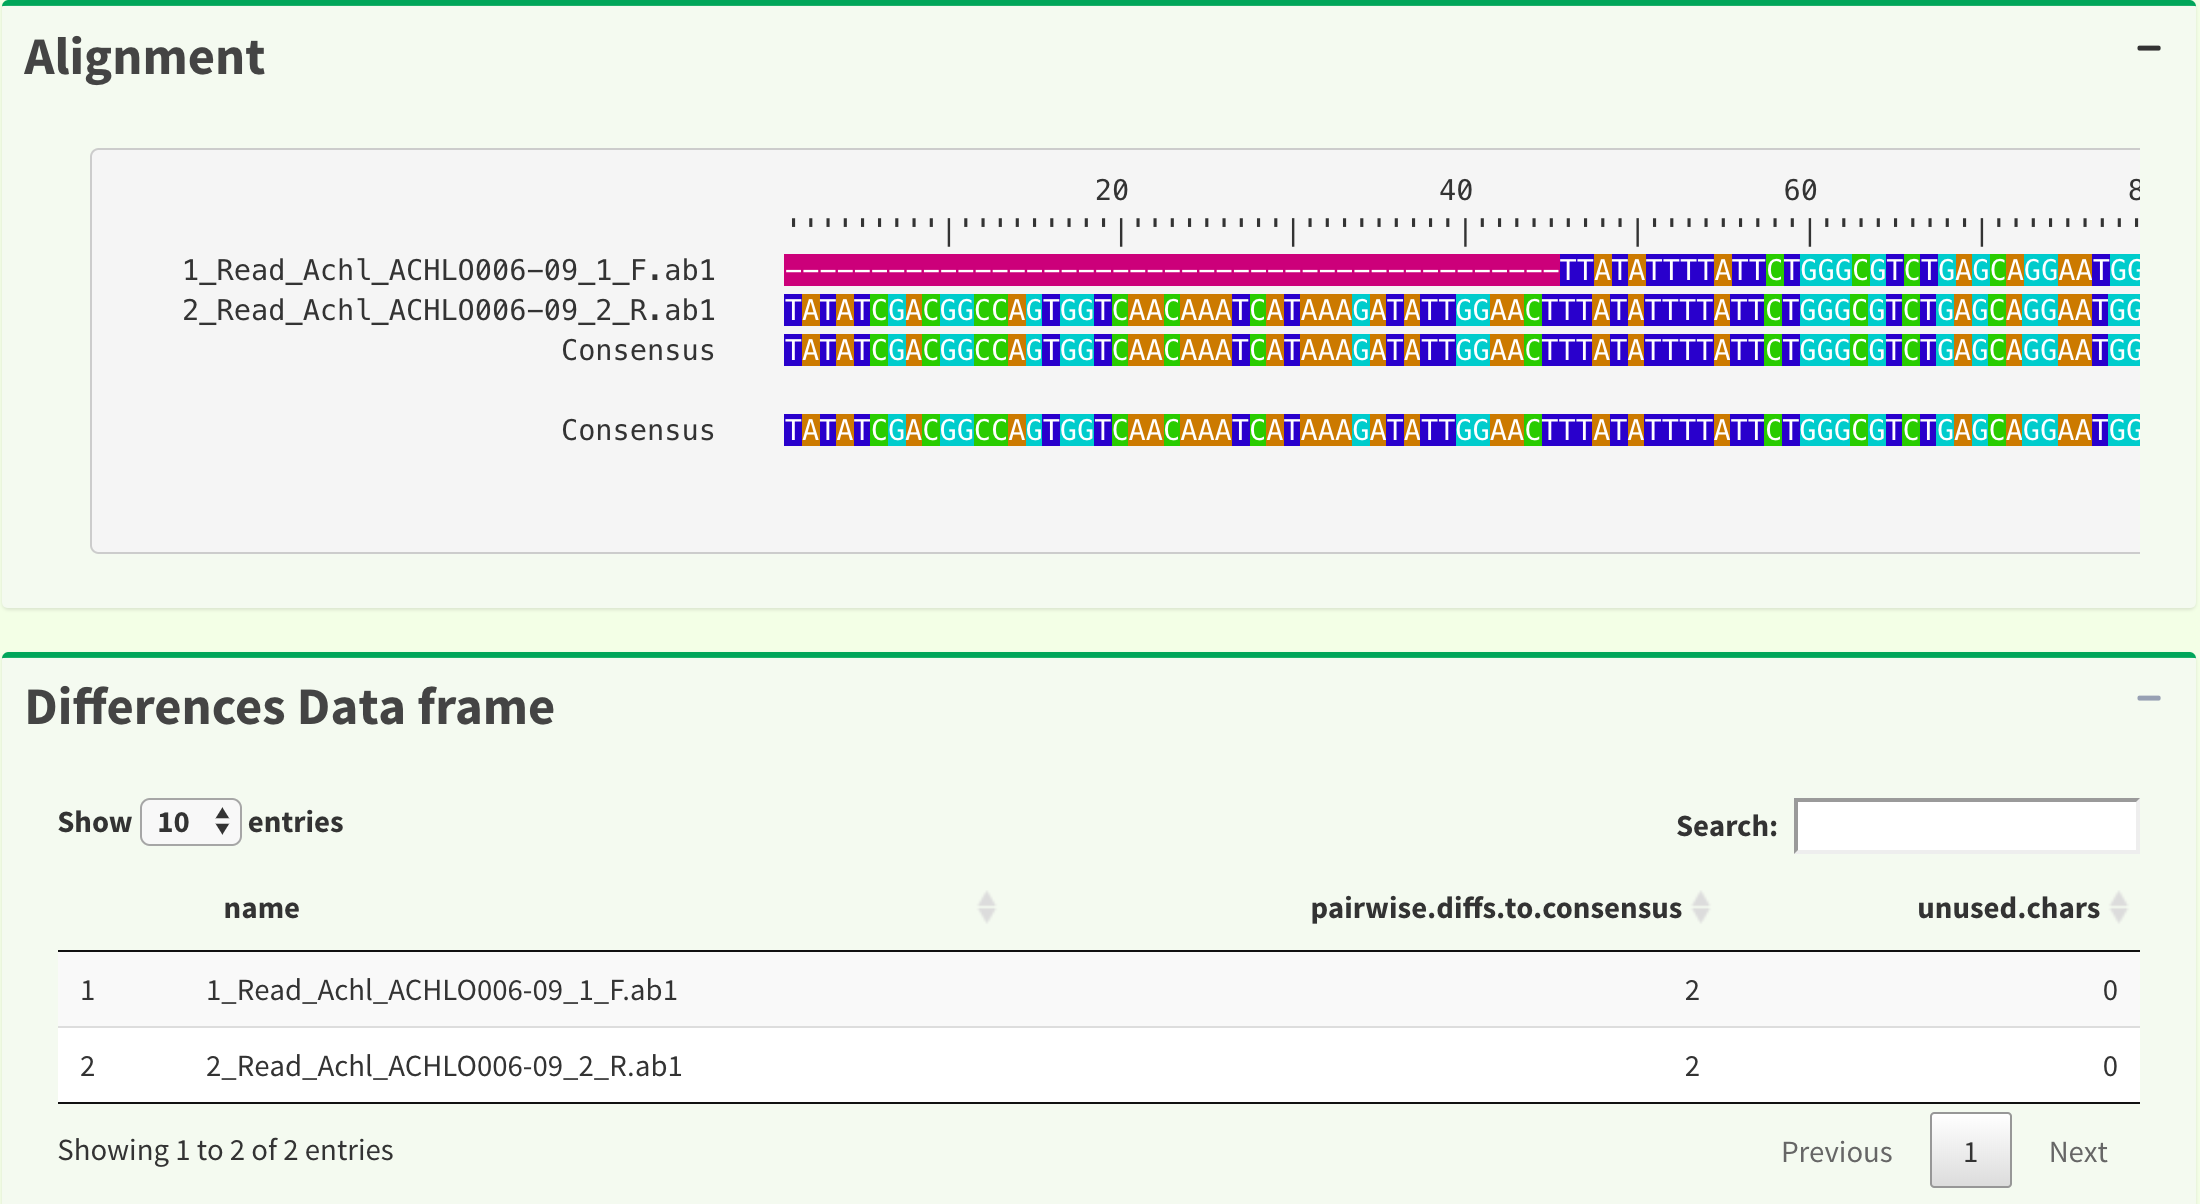
Figure 6. SangerContig page - reads alignment and difference data frame.
Figure 7 shows dendrogram result in both plot and in data frame. The results are generated by TreeLine function in DECIPHER package.
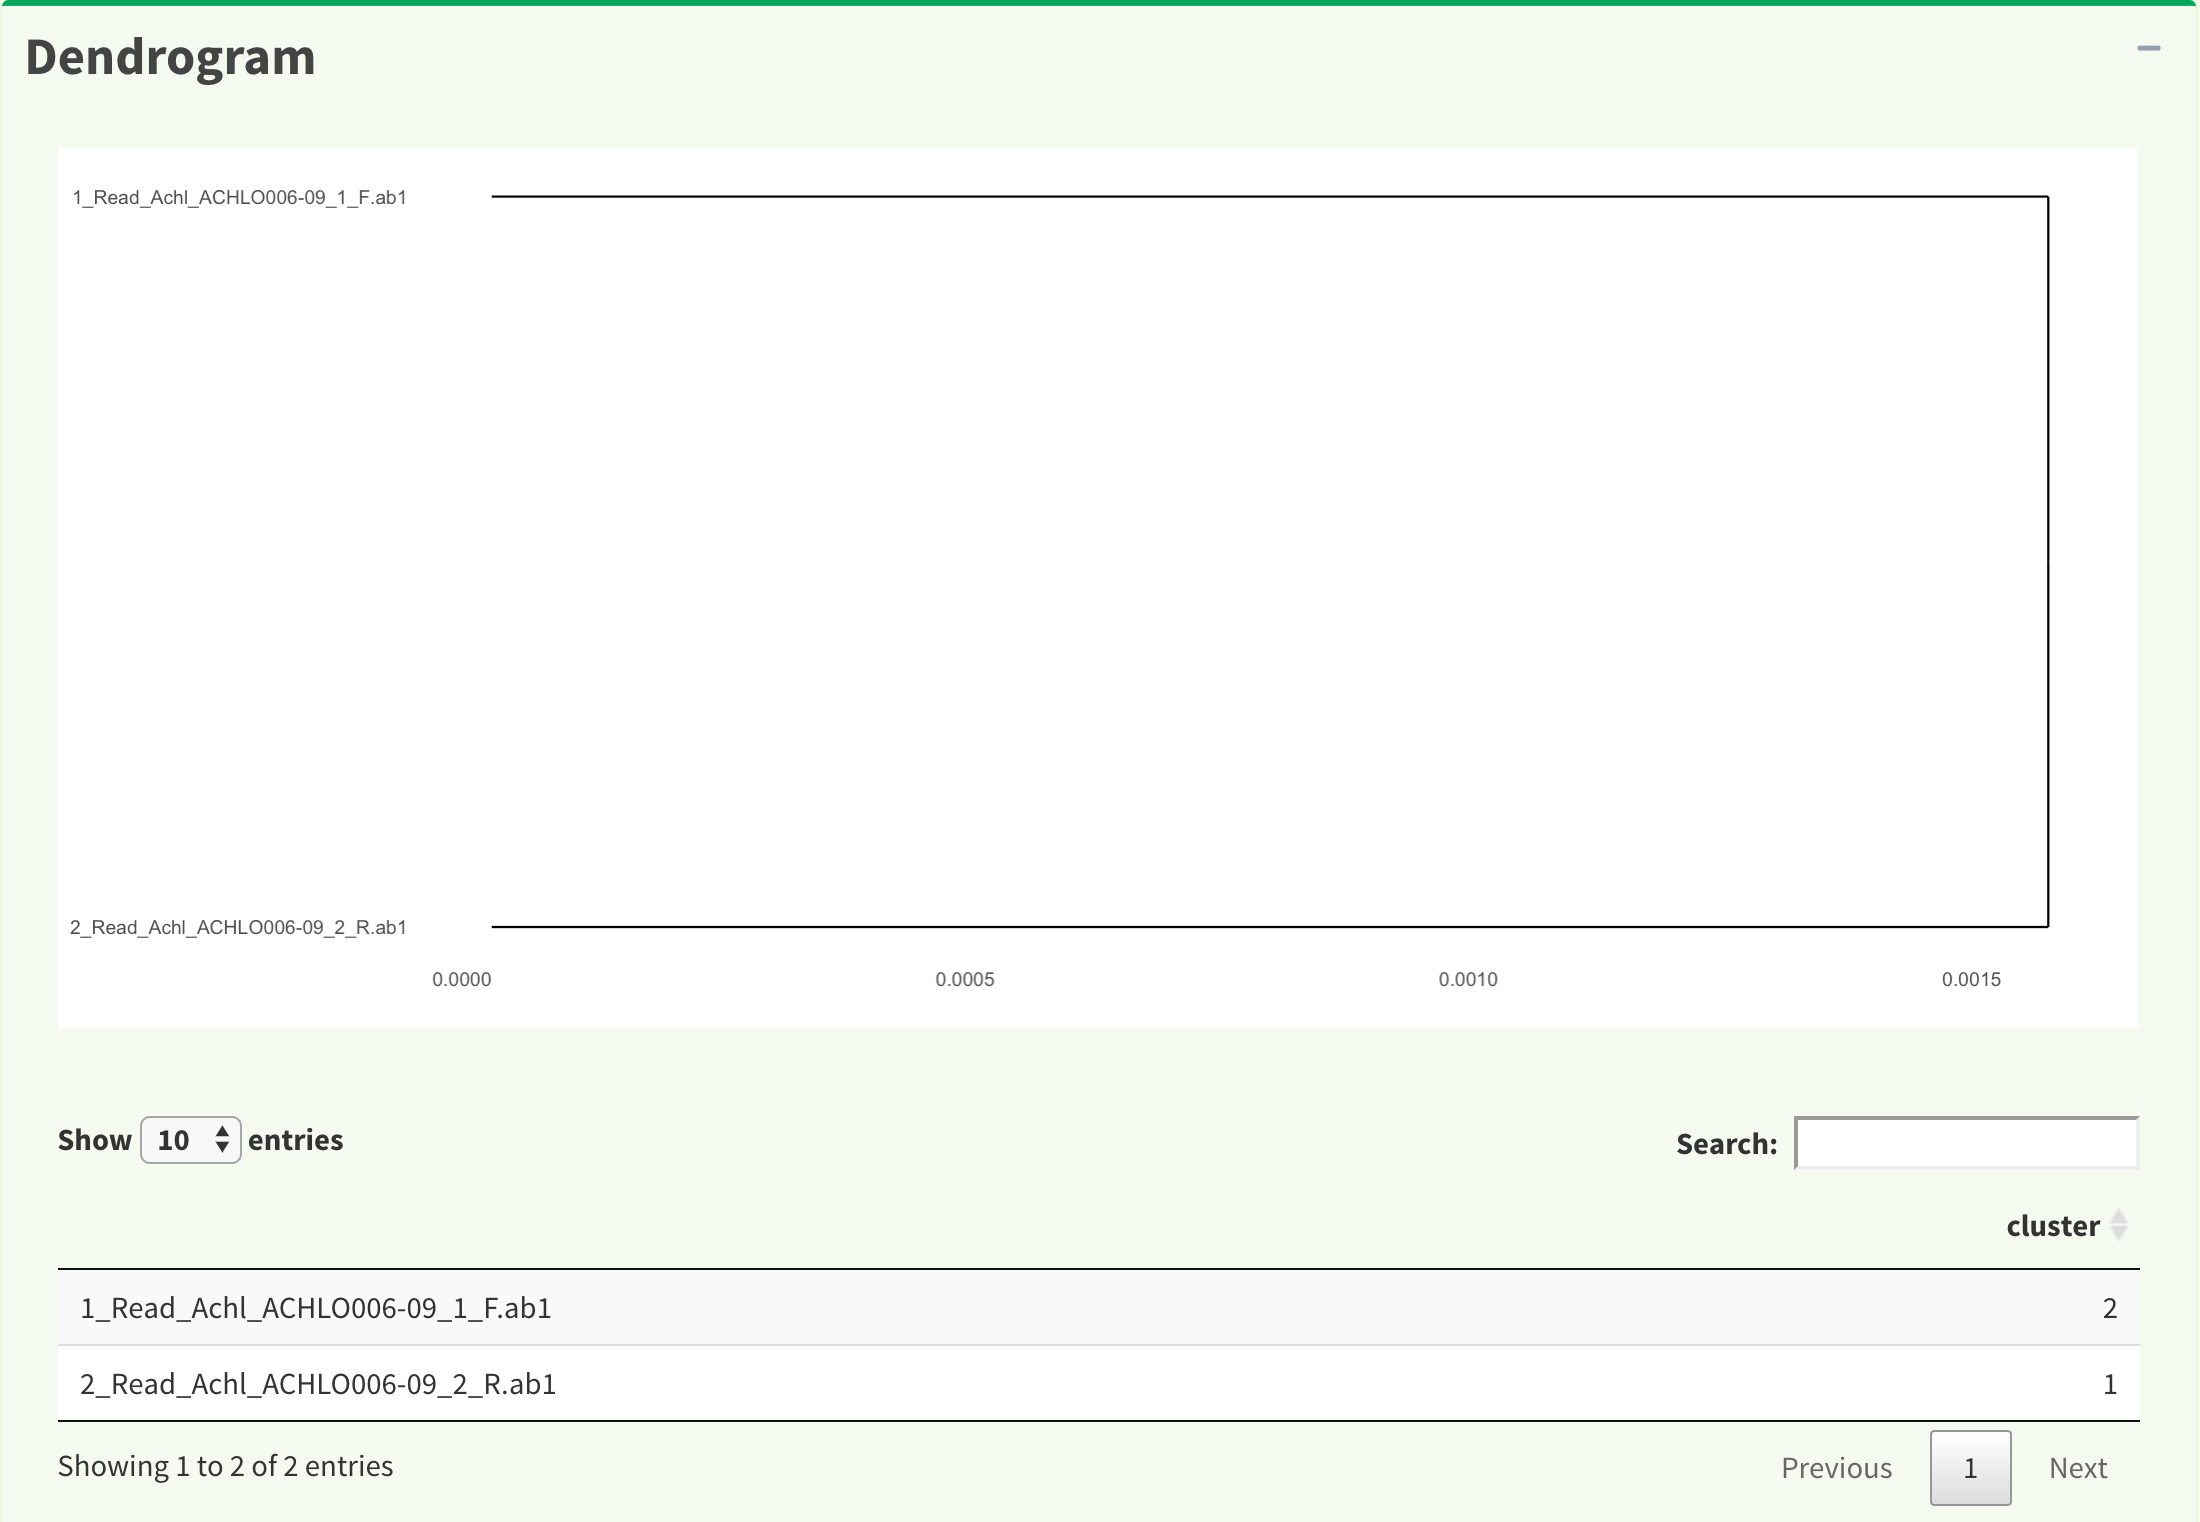
Figure 7. SangerContig page - dendrogram.
Figure 8 shows distance between AB1 files. The results are generated by DistanceMatrix function in DECIPHER package. The heatmap is generated by plot_ly function in plotly package.
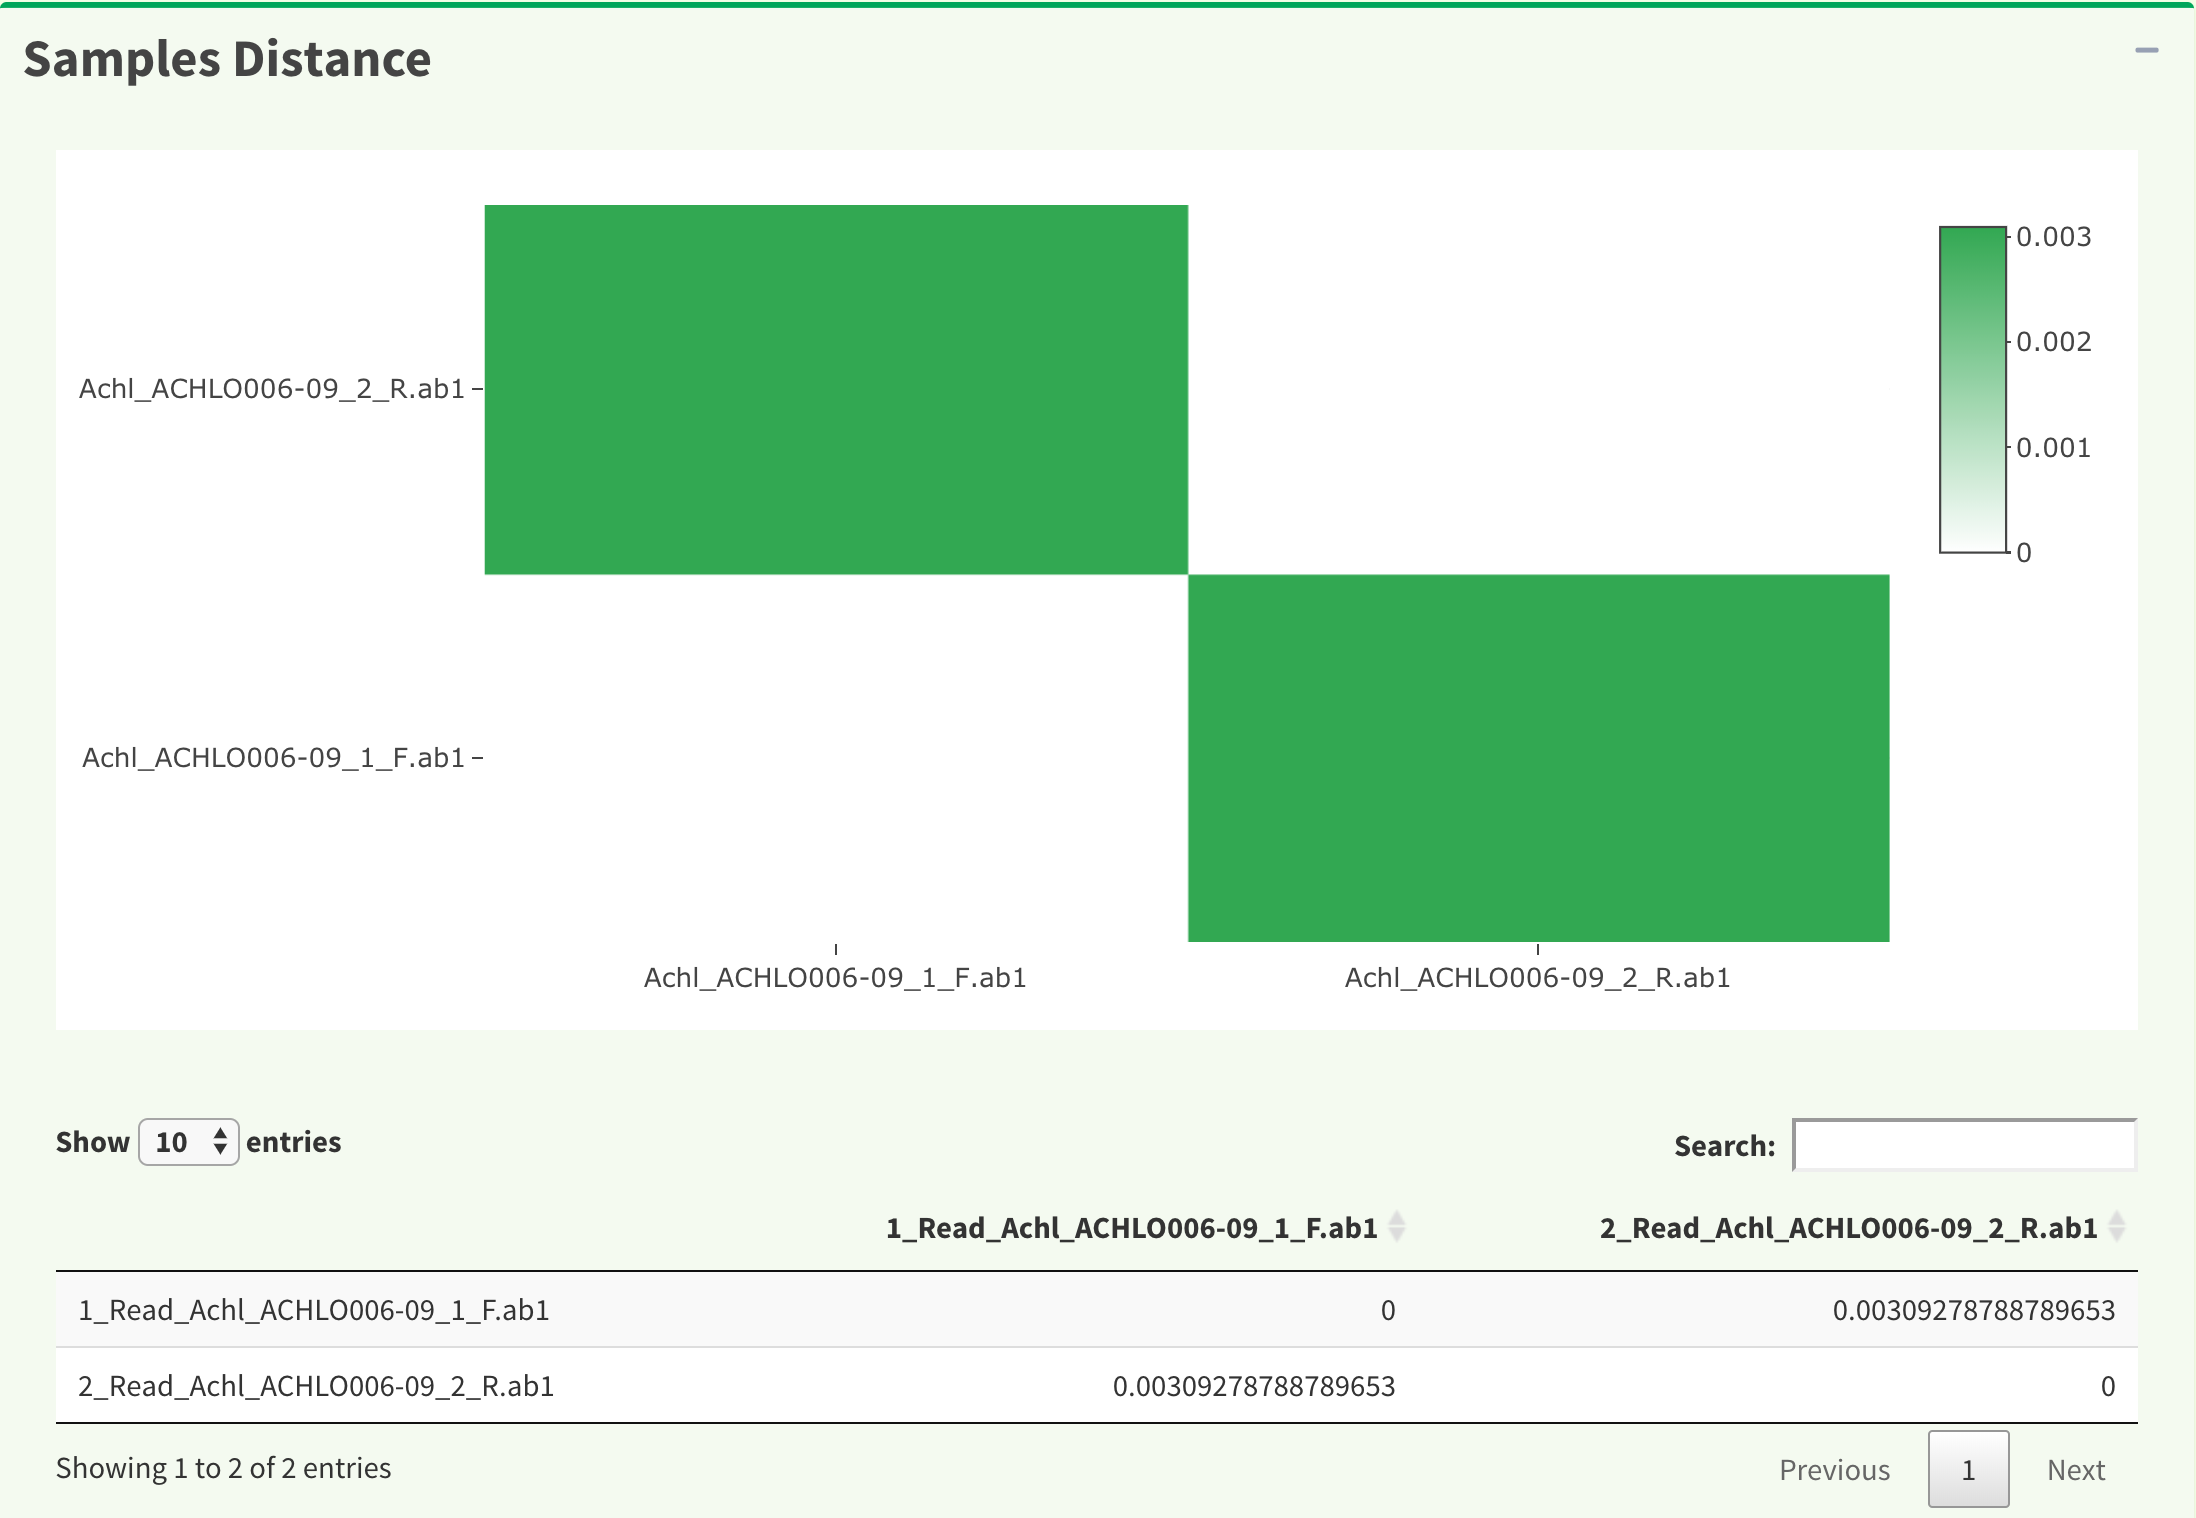
Figure 8. SangerContig page - samples distance.
Figure 9 shows insertions, deletions and stop codons data frame.
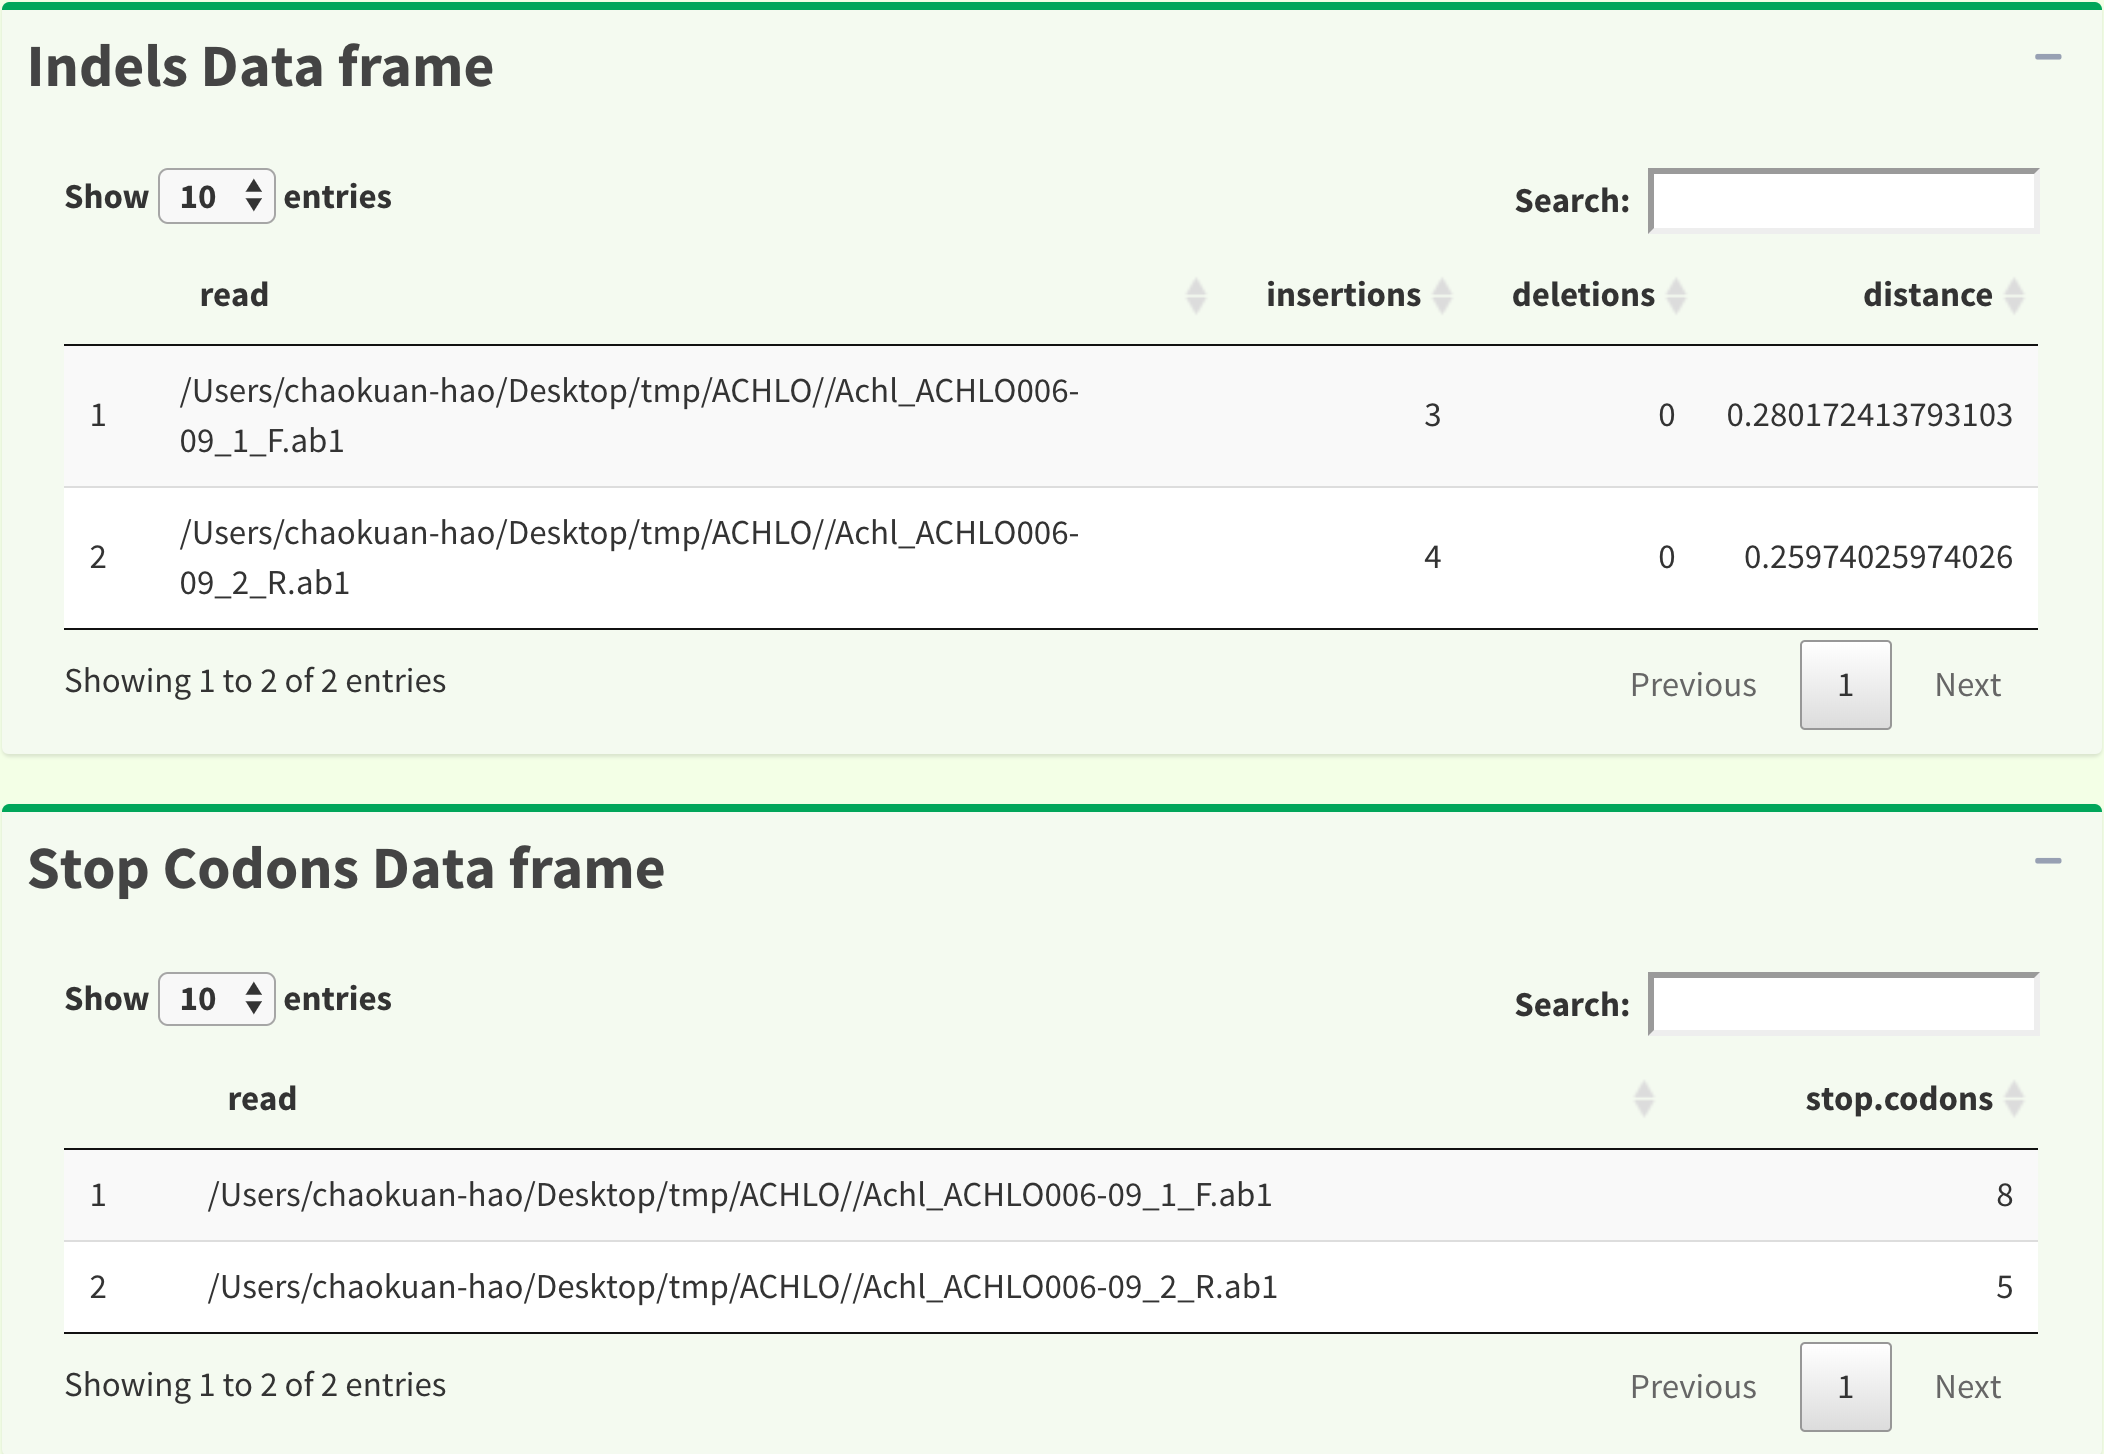
Figure 9. SangerContig page - indels and stop codons data frame.
SangerRead page (SC app)
Now, let’s go to the next level which is also the lowest level, SangerRead page. SangerRead page contains all details of a read including its trimming and chromatogram inputs and results. All reads are in “forward” or “reverse” direction. In this example, there is one read in each direction and Figure 10 shows “1 Forward Read” page. This page provides basic information, quality trimming inputs, chromatogram plotting inputs etc. Primary/secondary sequences and quality Phred scores table in this figure are dynamic based on the signalRatioCutoff value for base calling and the length of them are always same. Another thing to mention is that primary/secondary sequences and the sequences in the chromatogram in Figure 15 below will always be same after trimming and their color codings for A/T/C/G are same as well.
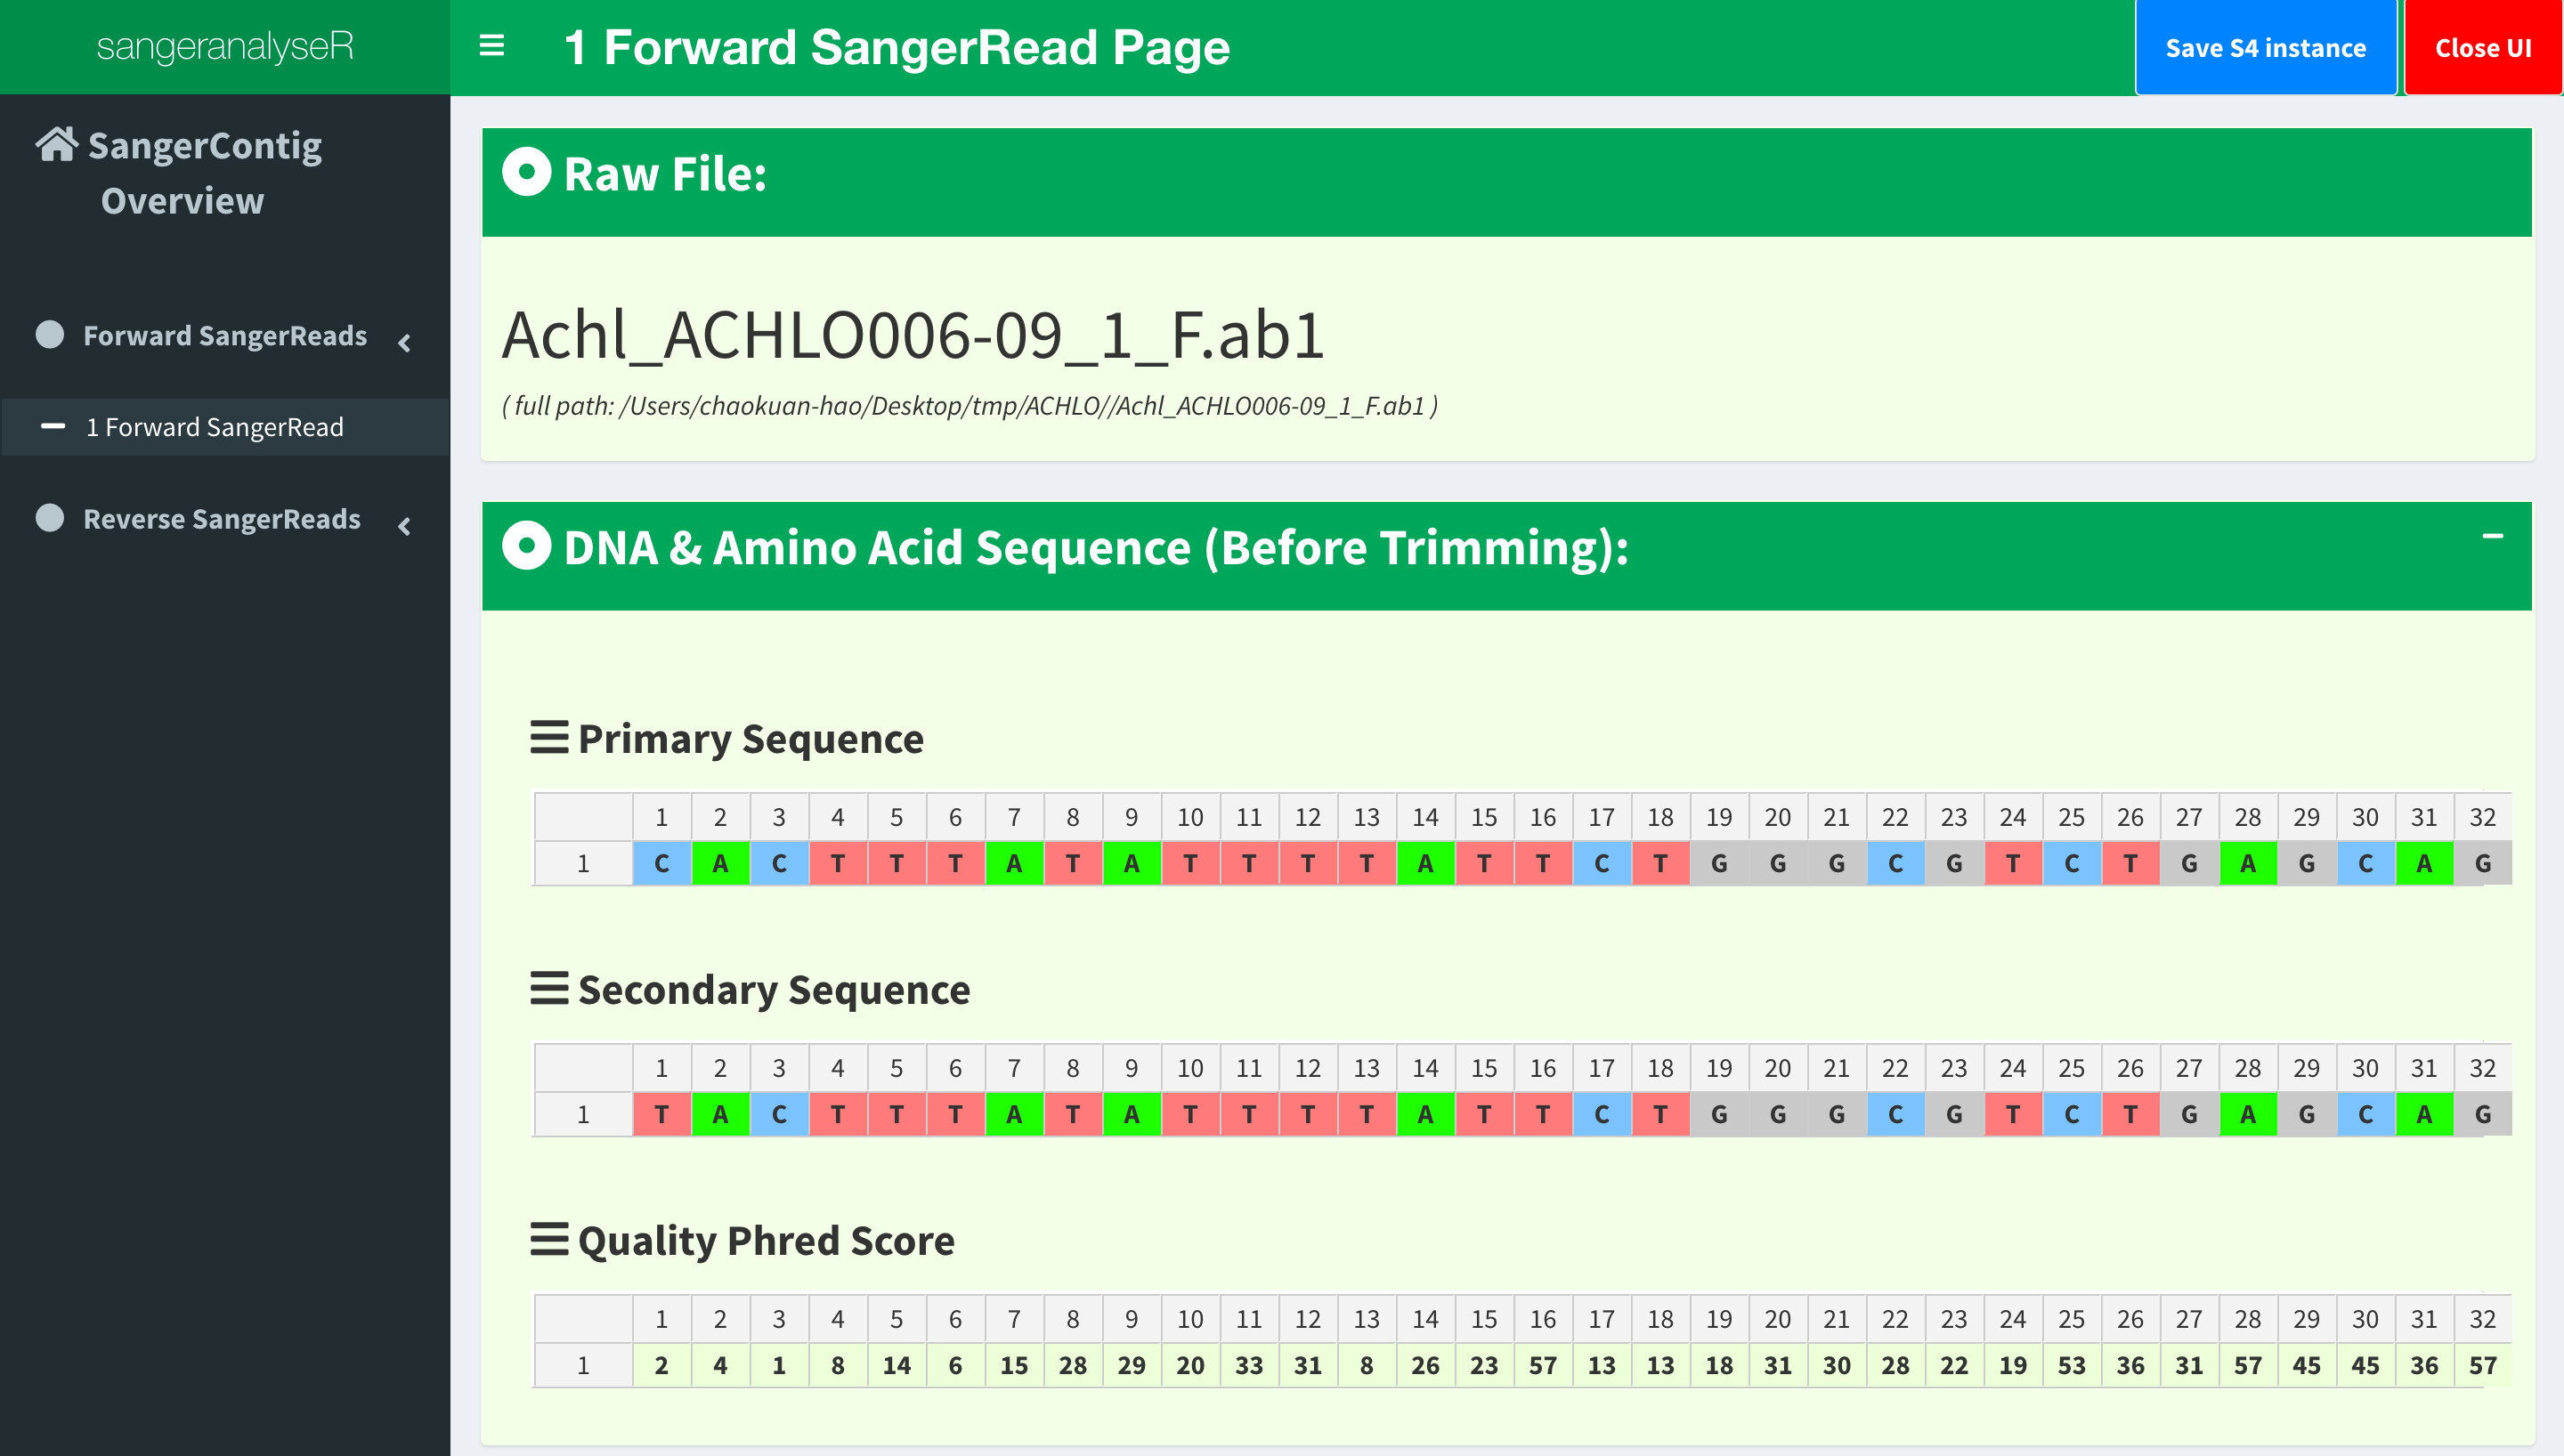
Figure 10. SangerContig Shiny app - SangerRead page
In quality trimming steps, we removes fragment at both ends of sequencing reads with low quality score. It is important because trimmed reads will improves alignment results. Figure 11 shows the UI for Trimming Method 1 (M1): ‘Modified Mott Trimming’. This method is implemented in Phred. Users can change the cutoff score and click “Apply Trimming Parameters” button to update the UI. The value of input must be between 0 and 1. If the input is invalid, the cutoff score will be set to default 0.0001.
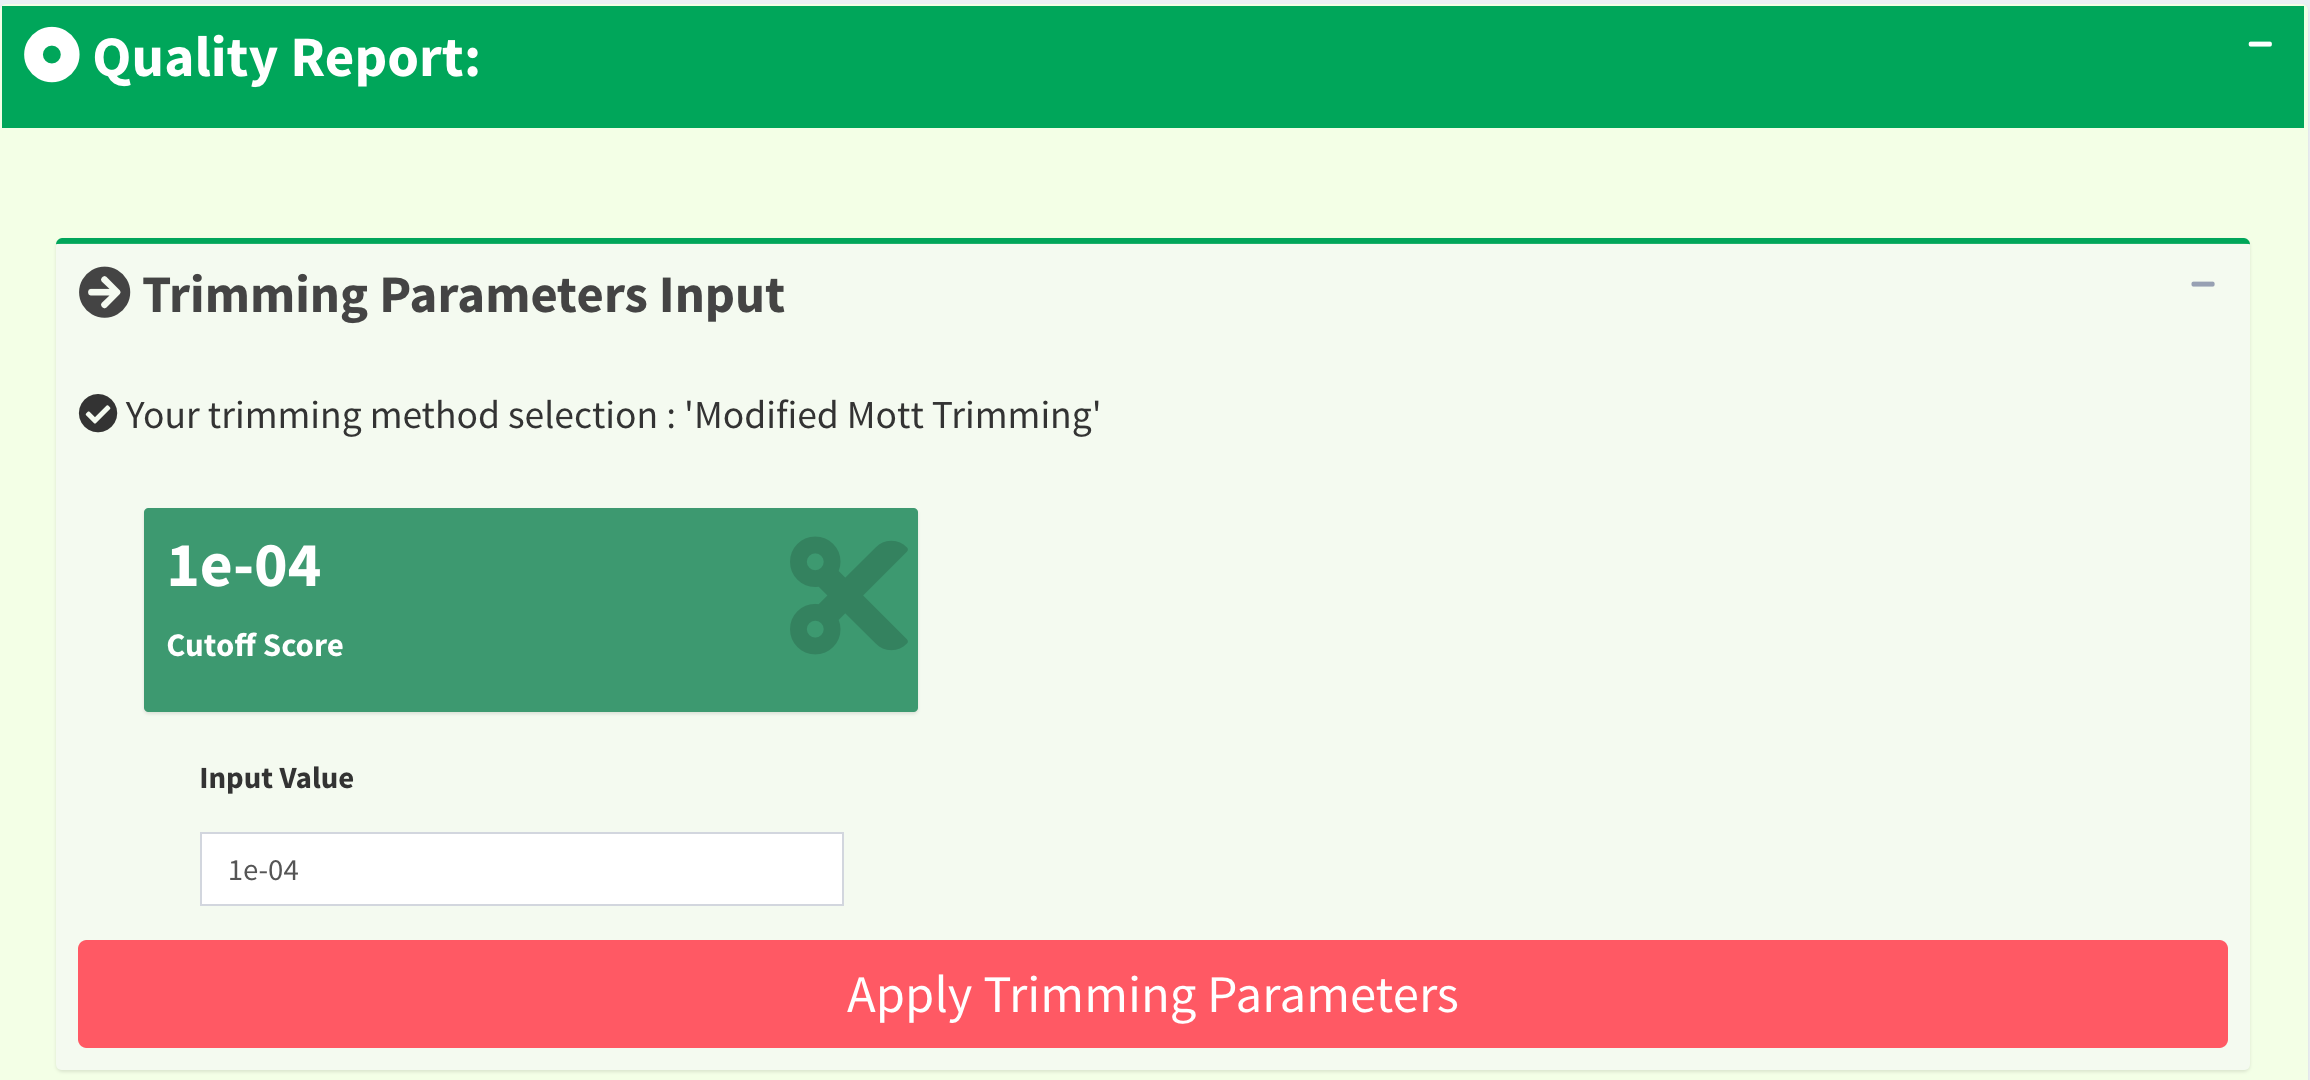
Figure 11. SangerRead page - Trimming Method 1 (M1): ‘Modified Mott Trimming’ UI.
Figure 12 shows another quality trimming method for users to choose from, Trimming Method 2 (M2): ‘Trimmomatics Sliding Window Trimming’. This method is implemented in Trimmomatics. Users can change the cutoff quality score as well as sliding window size and click “Apply Trimming Parameters” button to update the UI. The value of cutoff quality score must be between 0 and 60 (default 20); the value of sliding window size must be between 0 and 40 (default 10). If the inputs are invalid, their values will be set to default.
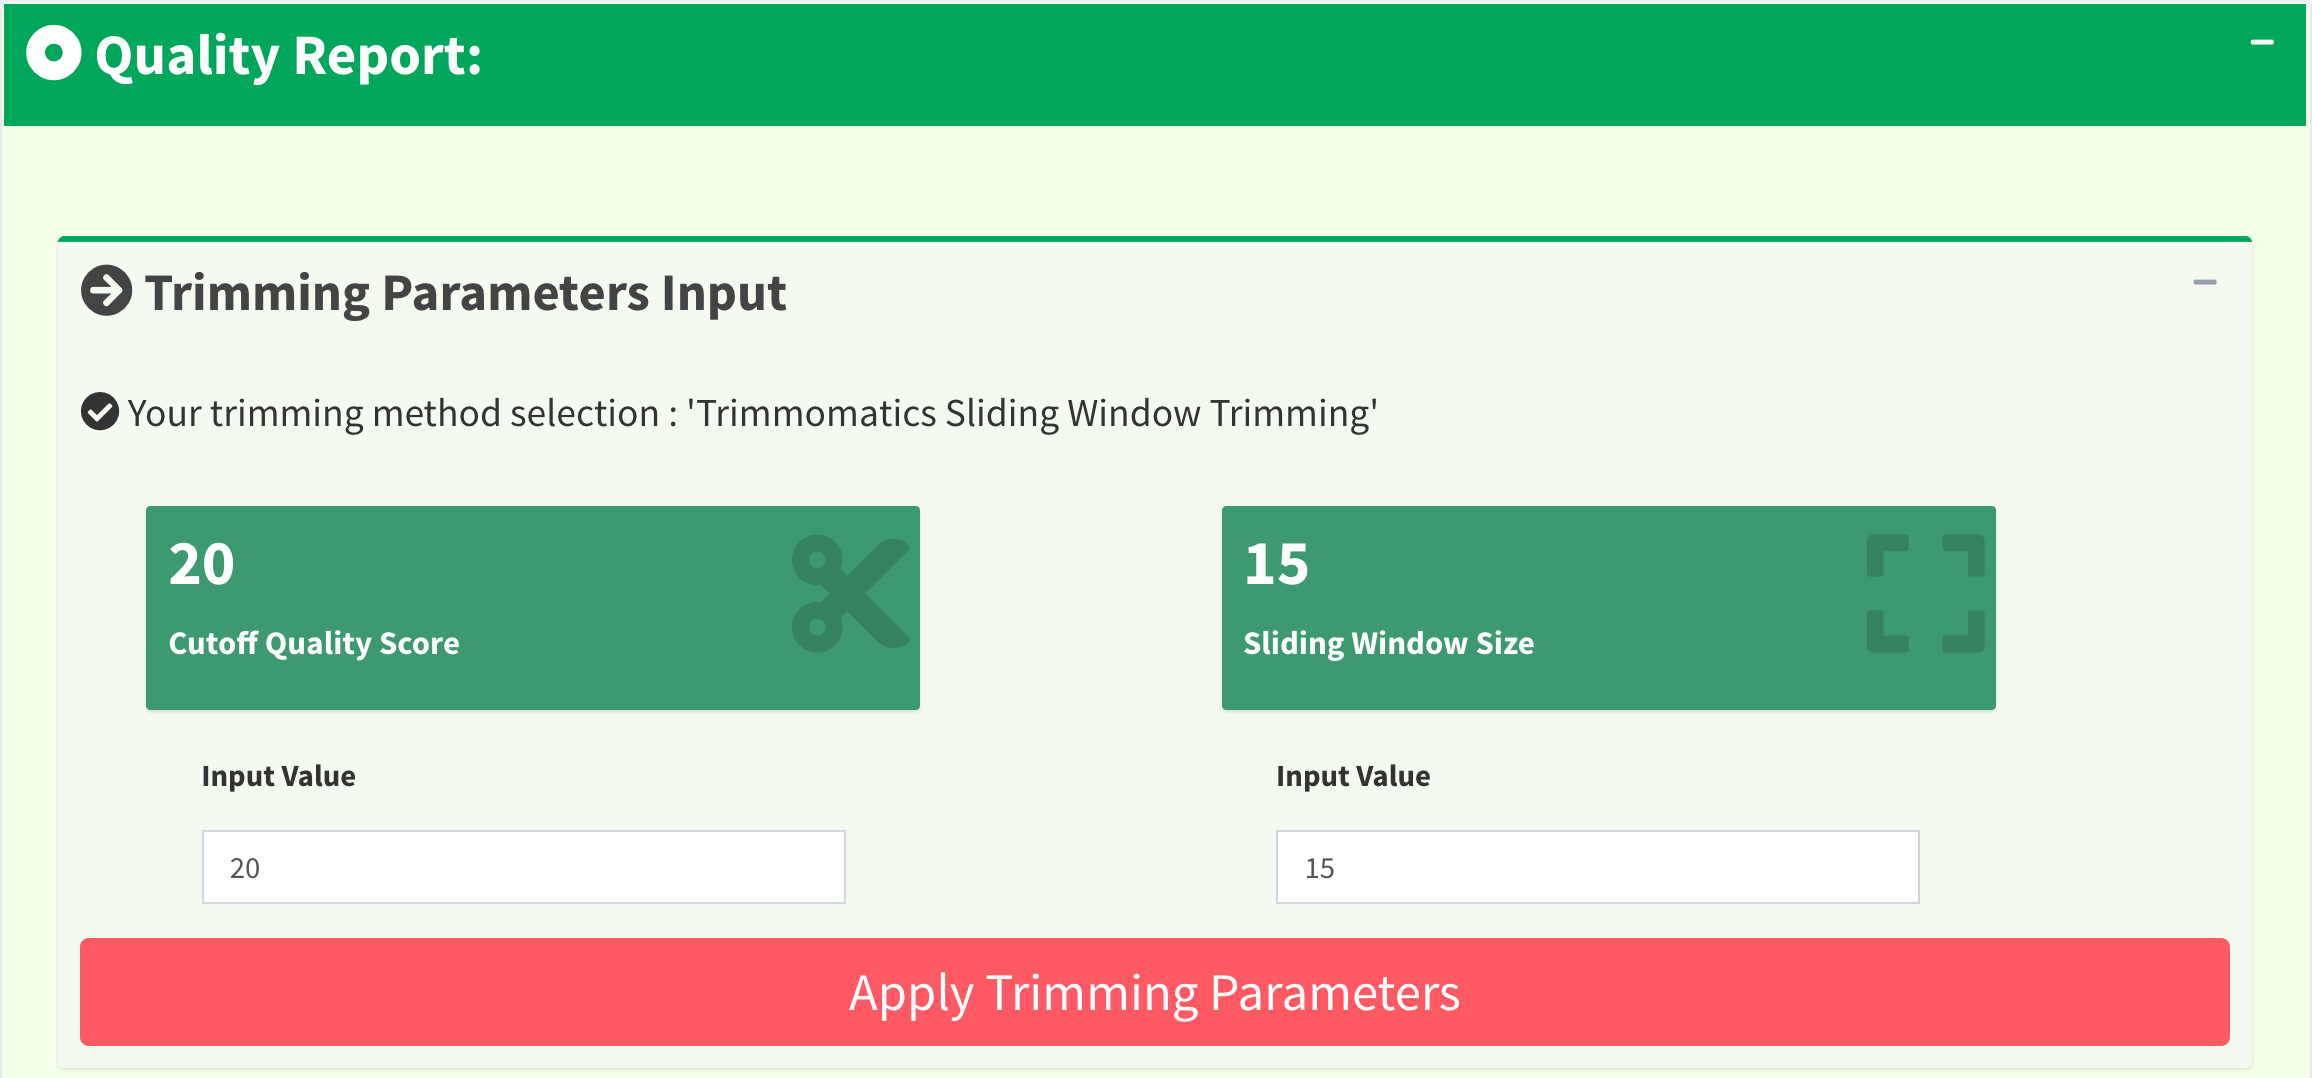
Figure 12. SangerRead page - Trimming Method 2 (M2): ‘Trimmomatics Sliding Window Trimming’ UI.
Figure 13 shows the quality report before and after trimming. After clicking the “Apply Trimming Parameters” button in Figure 11 or Figure 12, the values of these information boxes will be updated to the latest values.
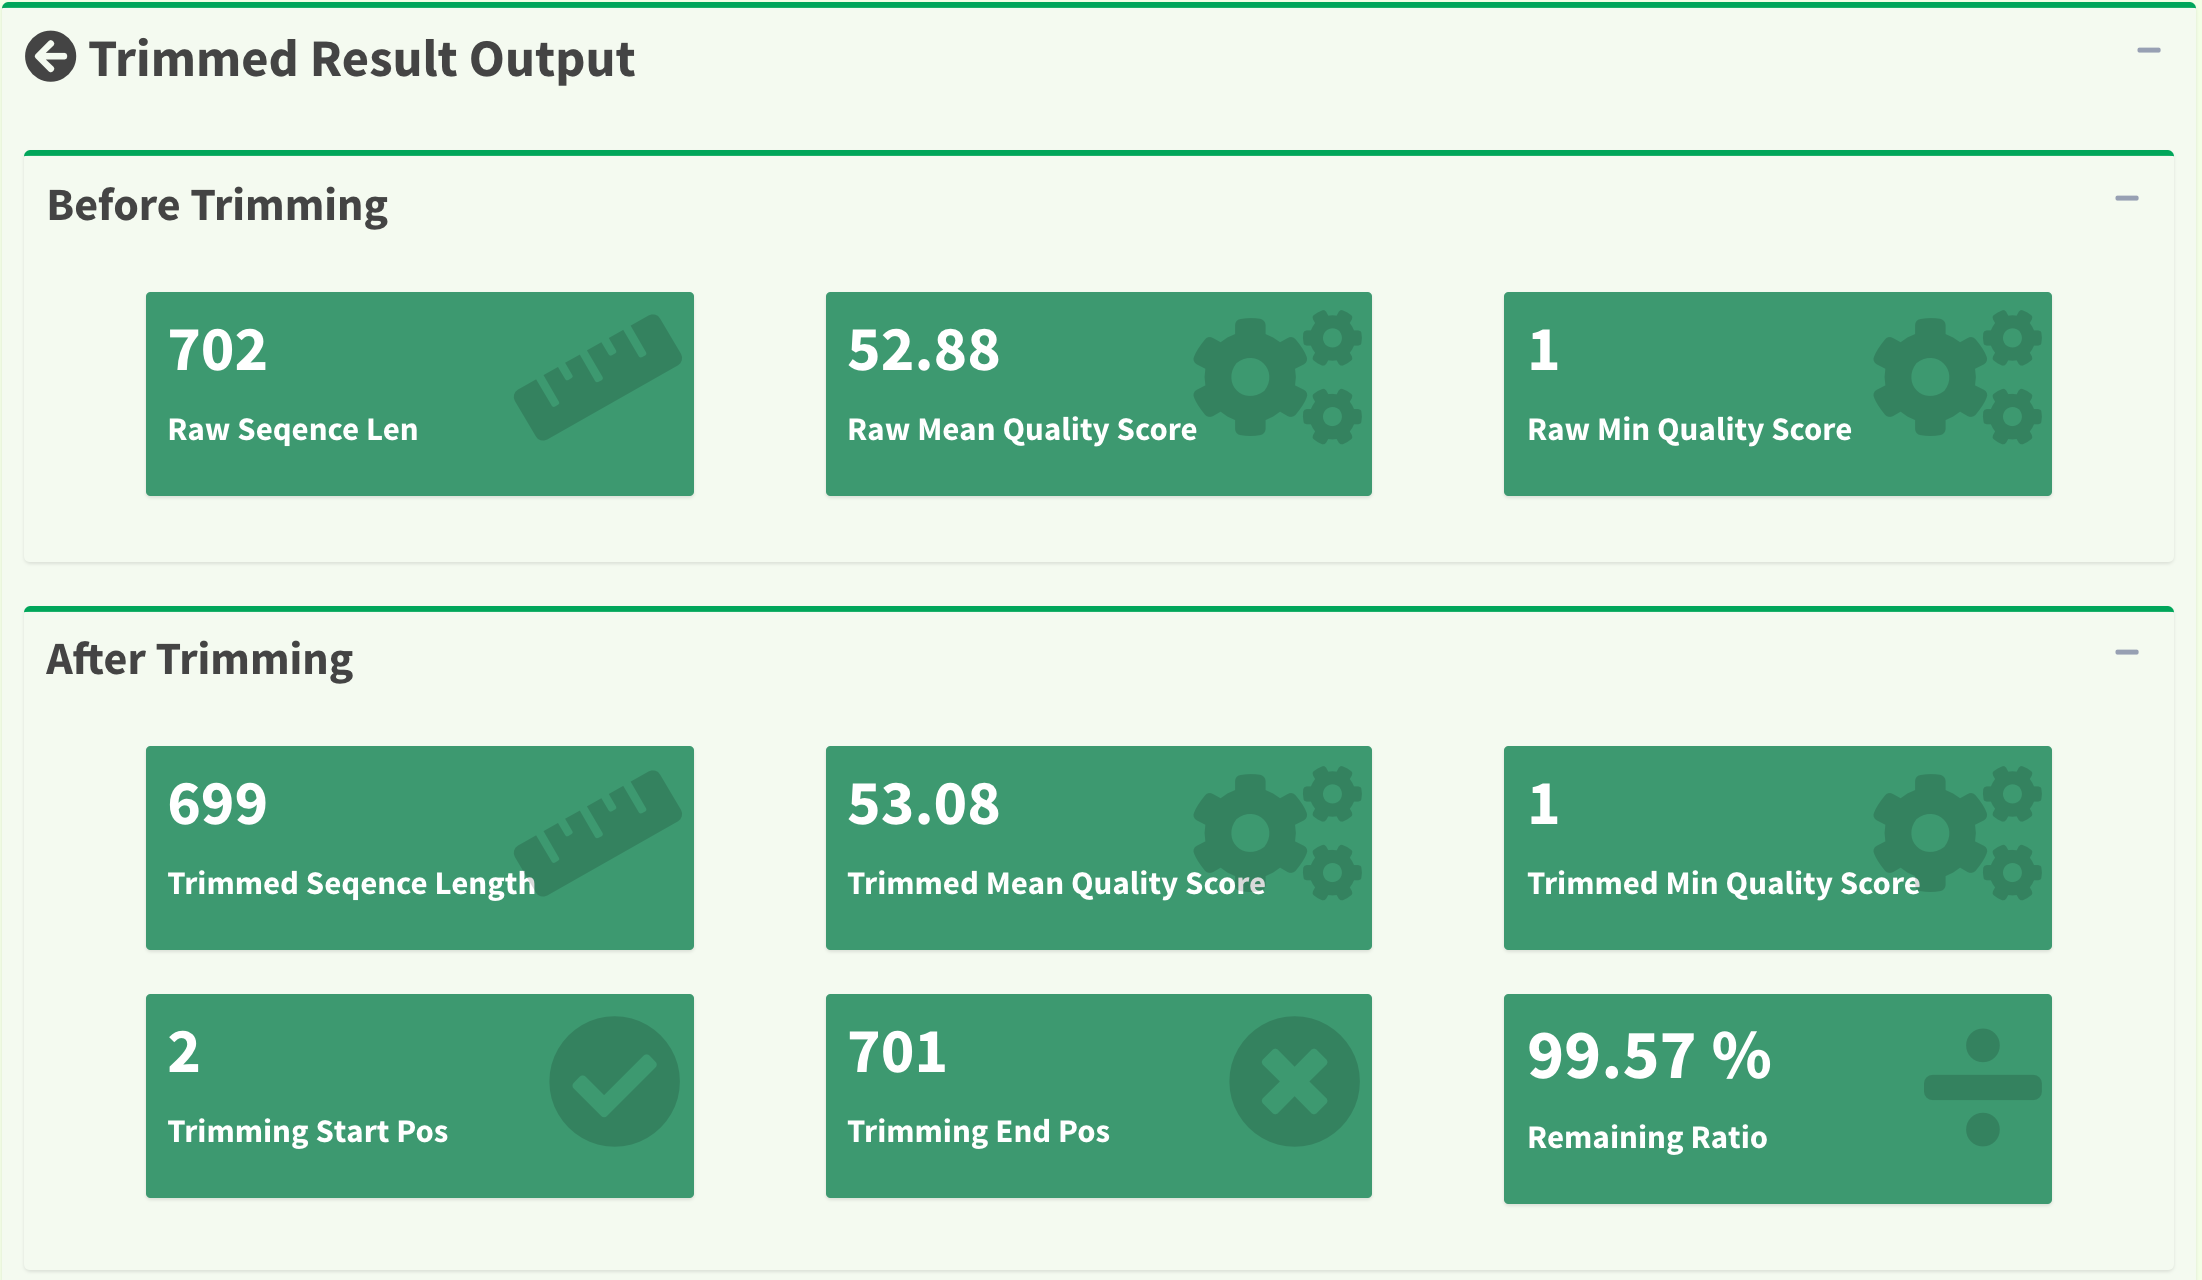
Figure 13. SangerRead page - read quality report before / after trimming.
In Figure 14, the x-axis is the index of the base pairs; the y-axis is the Phred quality score. The green horizontal bar at the top of the plot is the raw read region and the orange horizontal bar represents the remaining read region. Both Figure 14 trimming plot and Figure 15 chromatogram will be updated once users change the quality trimming parameters and click the “Apply Trimming Parameters” button in Figure 15.
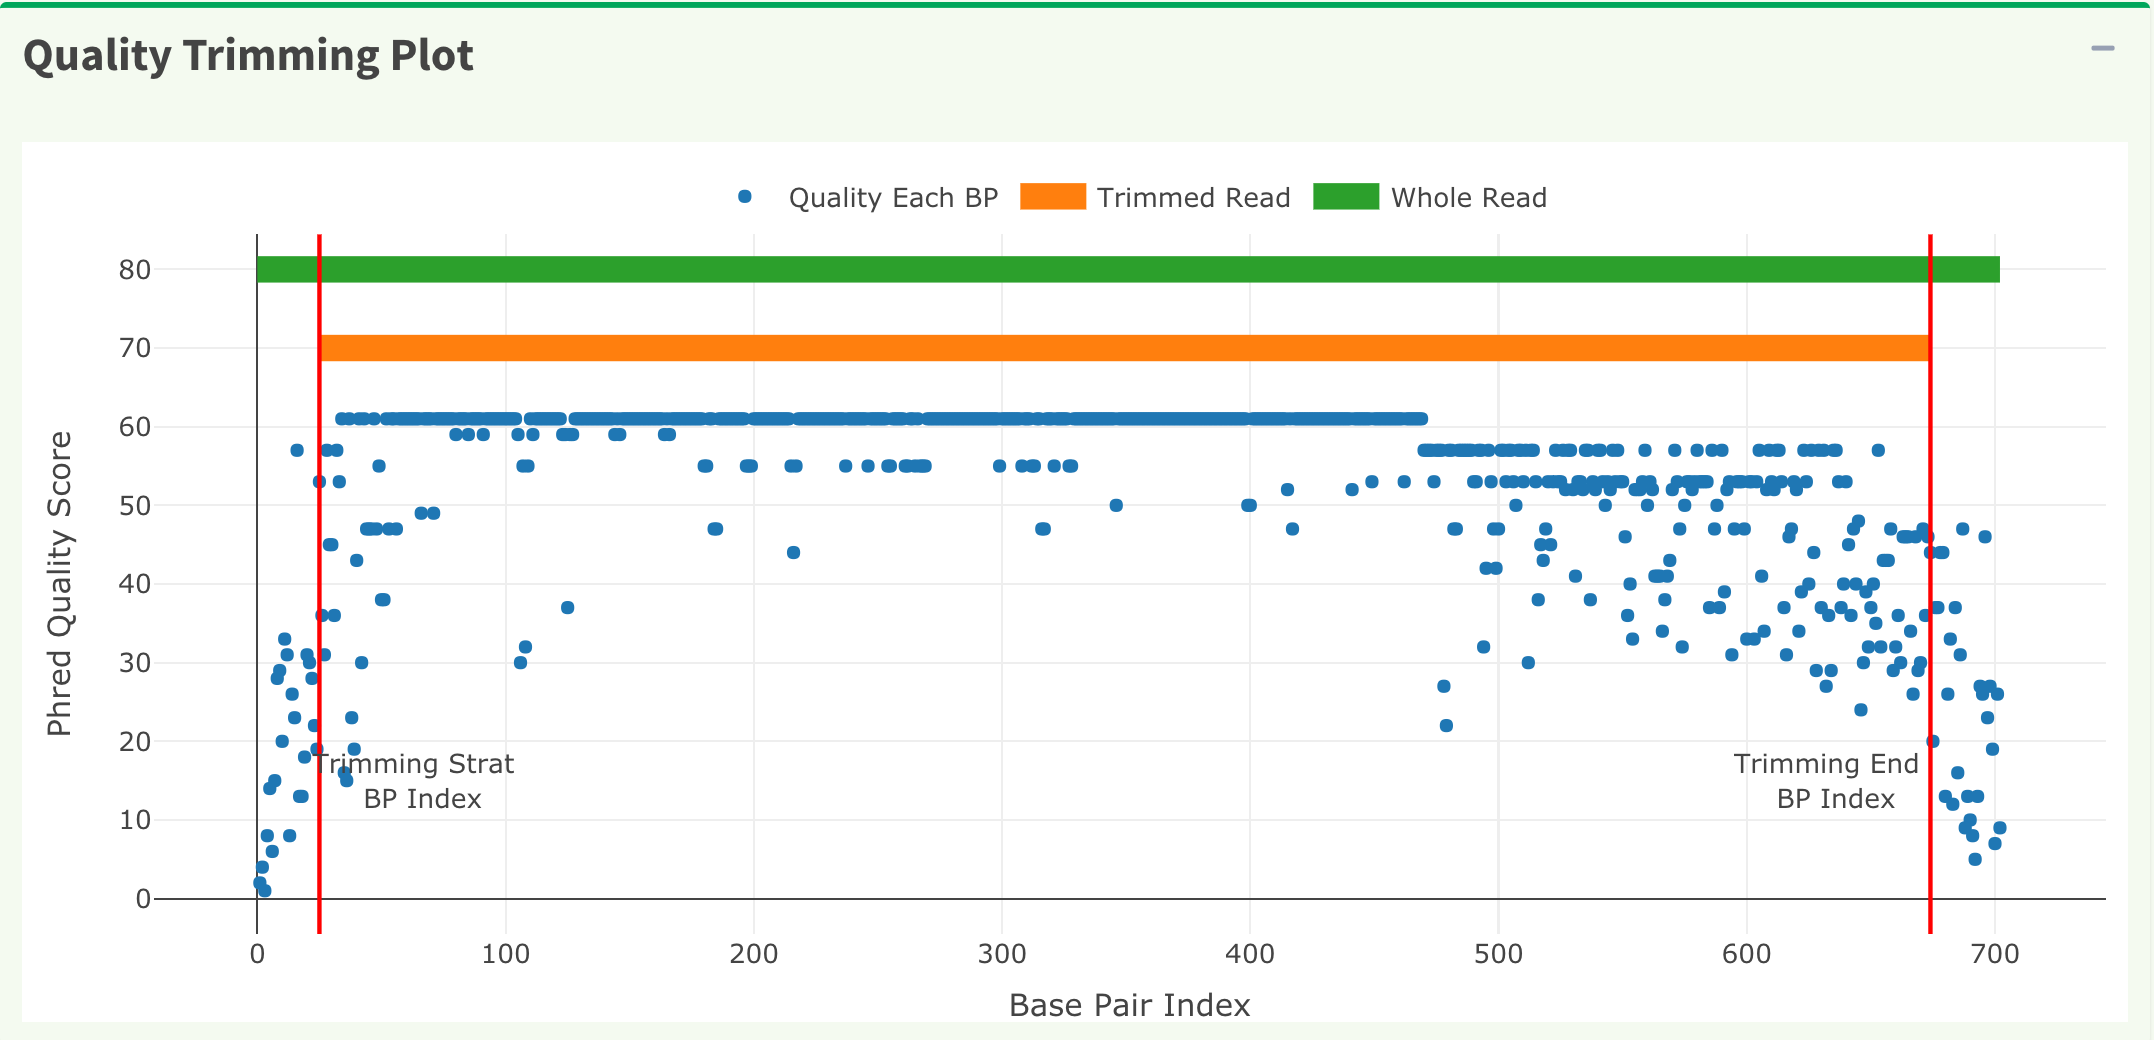
Figure 14. SangerContig page - quality trimming plot.
If we only see primary and secondary sequences in the table, we will loose some variations. Chromatogram is very helpful to check the peak resolution. Figure 15 shows the panel of plotting chromatogram. Users can change four parameters: Base Number Per Row, Height Per Row, Signal Ratio Cutoff, and Show Trimmed Region. Among them, Signal Ratio Cutoff is a key parameter. If its value is default value 0.33, it indicates that the lower peak should be at least 1/3rd as high as the higher peak for it count as a secondary peak.
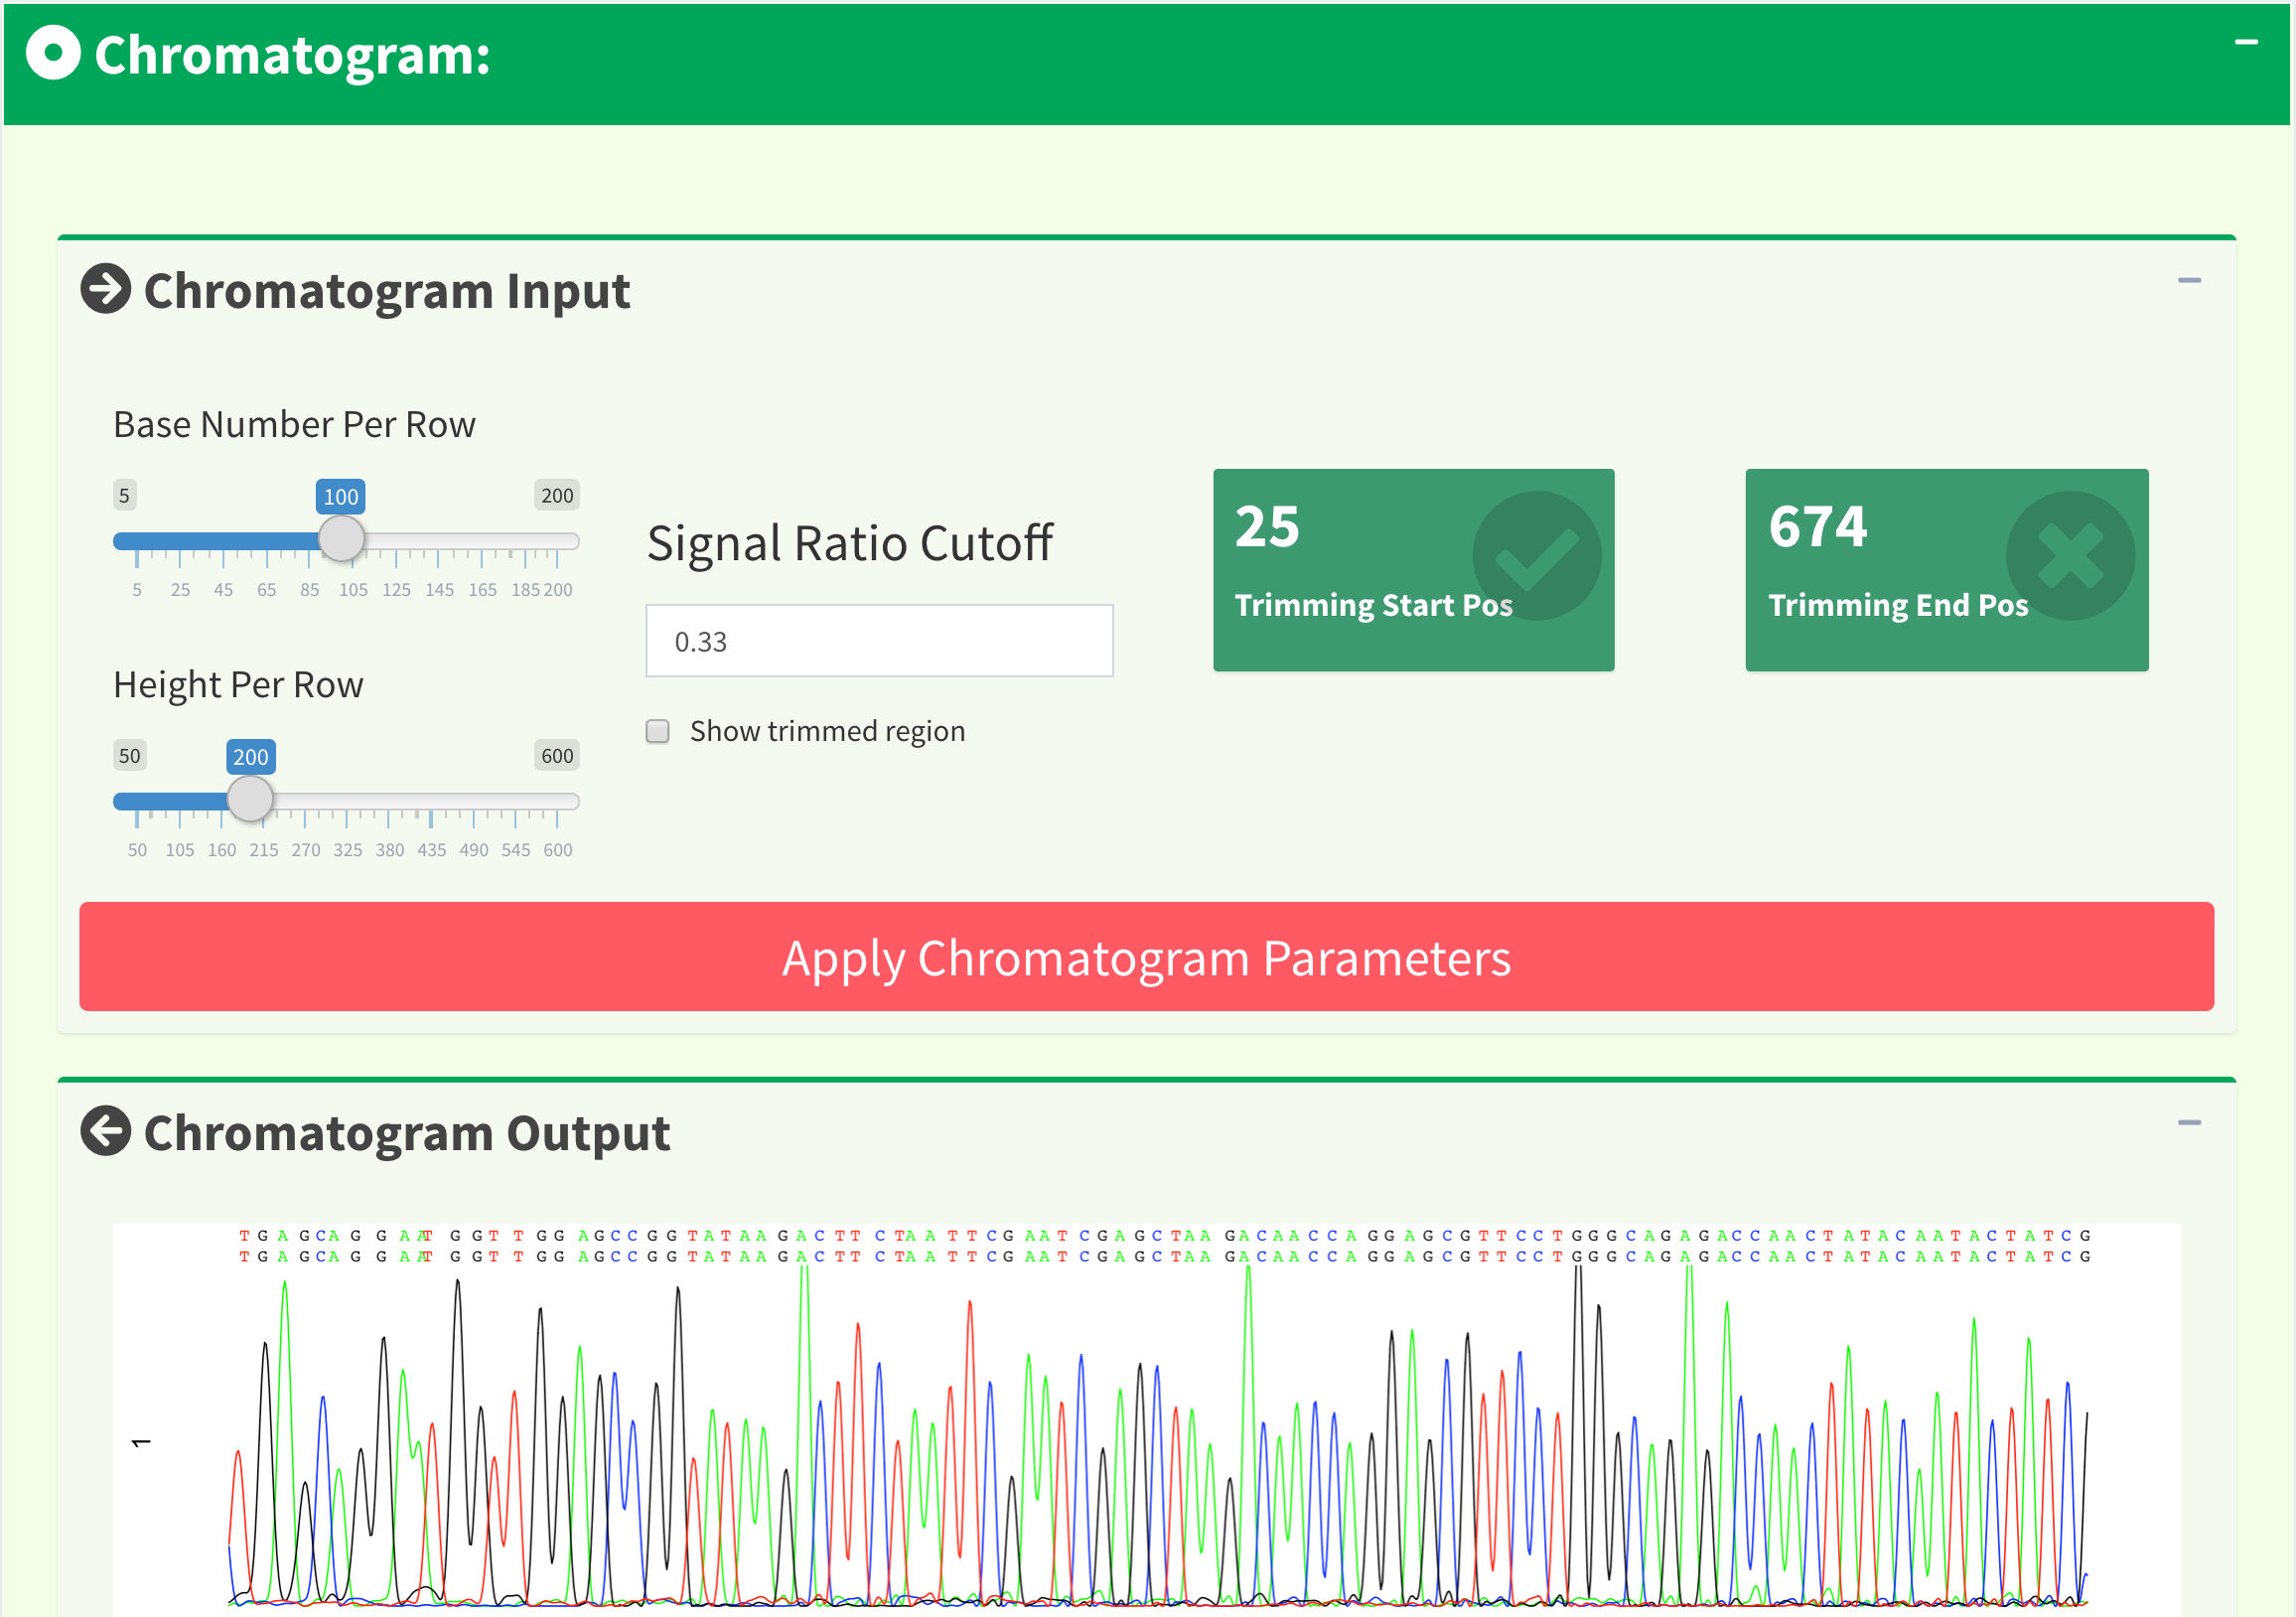
Figure 15. SangerContig page - chromatogram panel.
Here is an example of applying new chromatogram parameters. We click “Show Trimmed Region” to set its value from FALSE to TRUE and click the “Apply Chromatogram Parameters” button. Figure 16 shows the loading notification popup during base calling and chromatogram plotting.
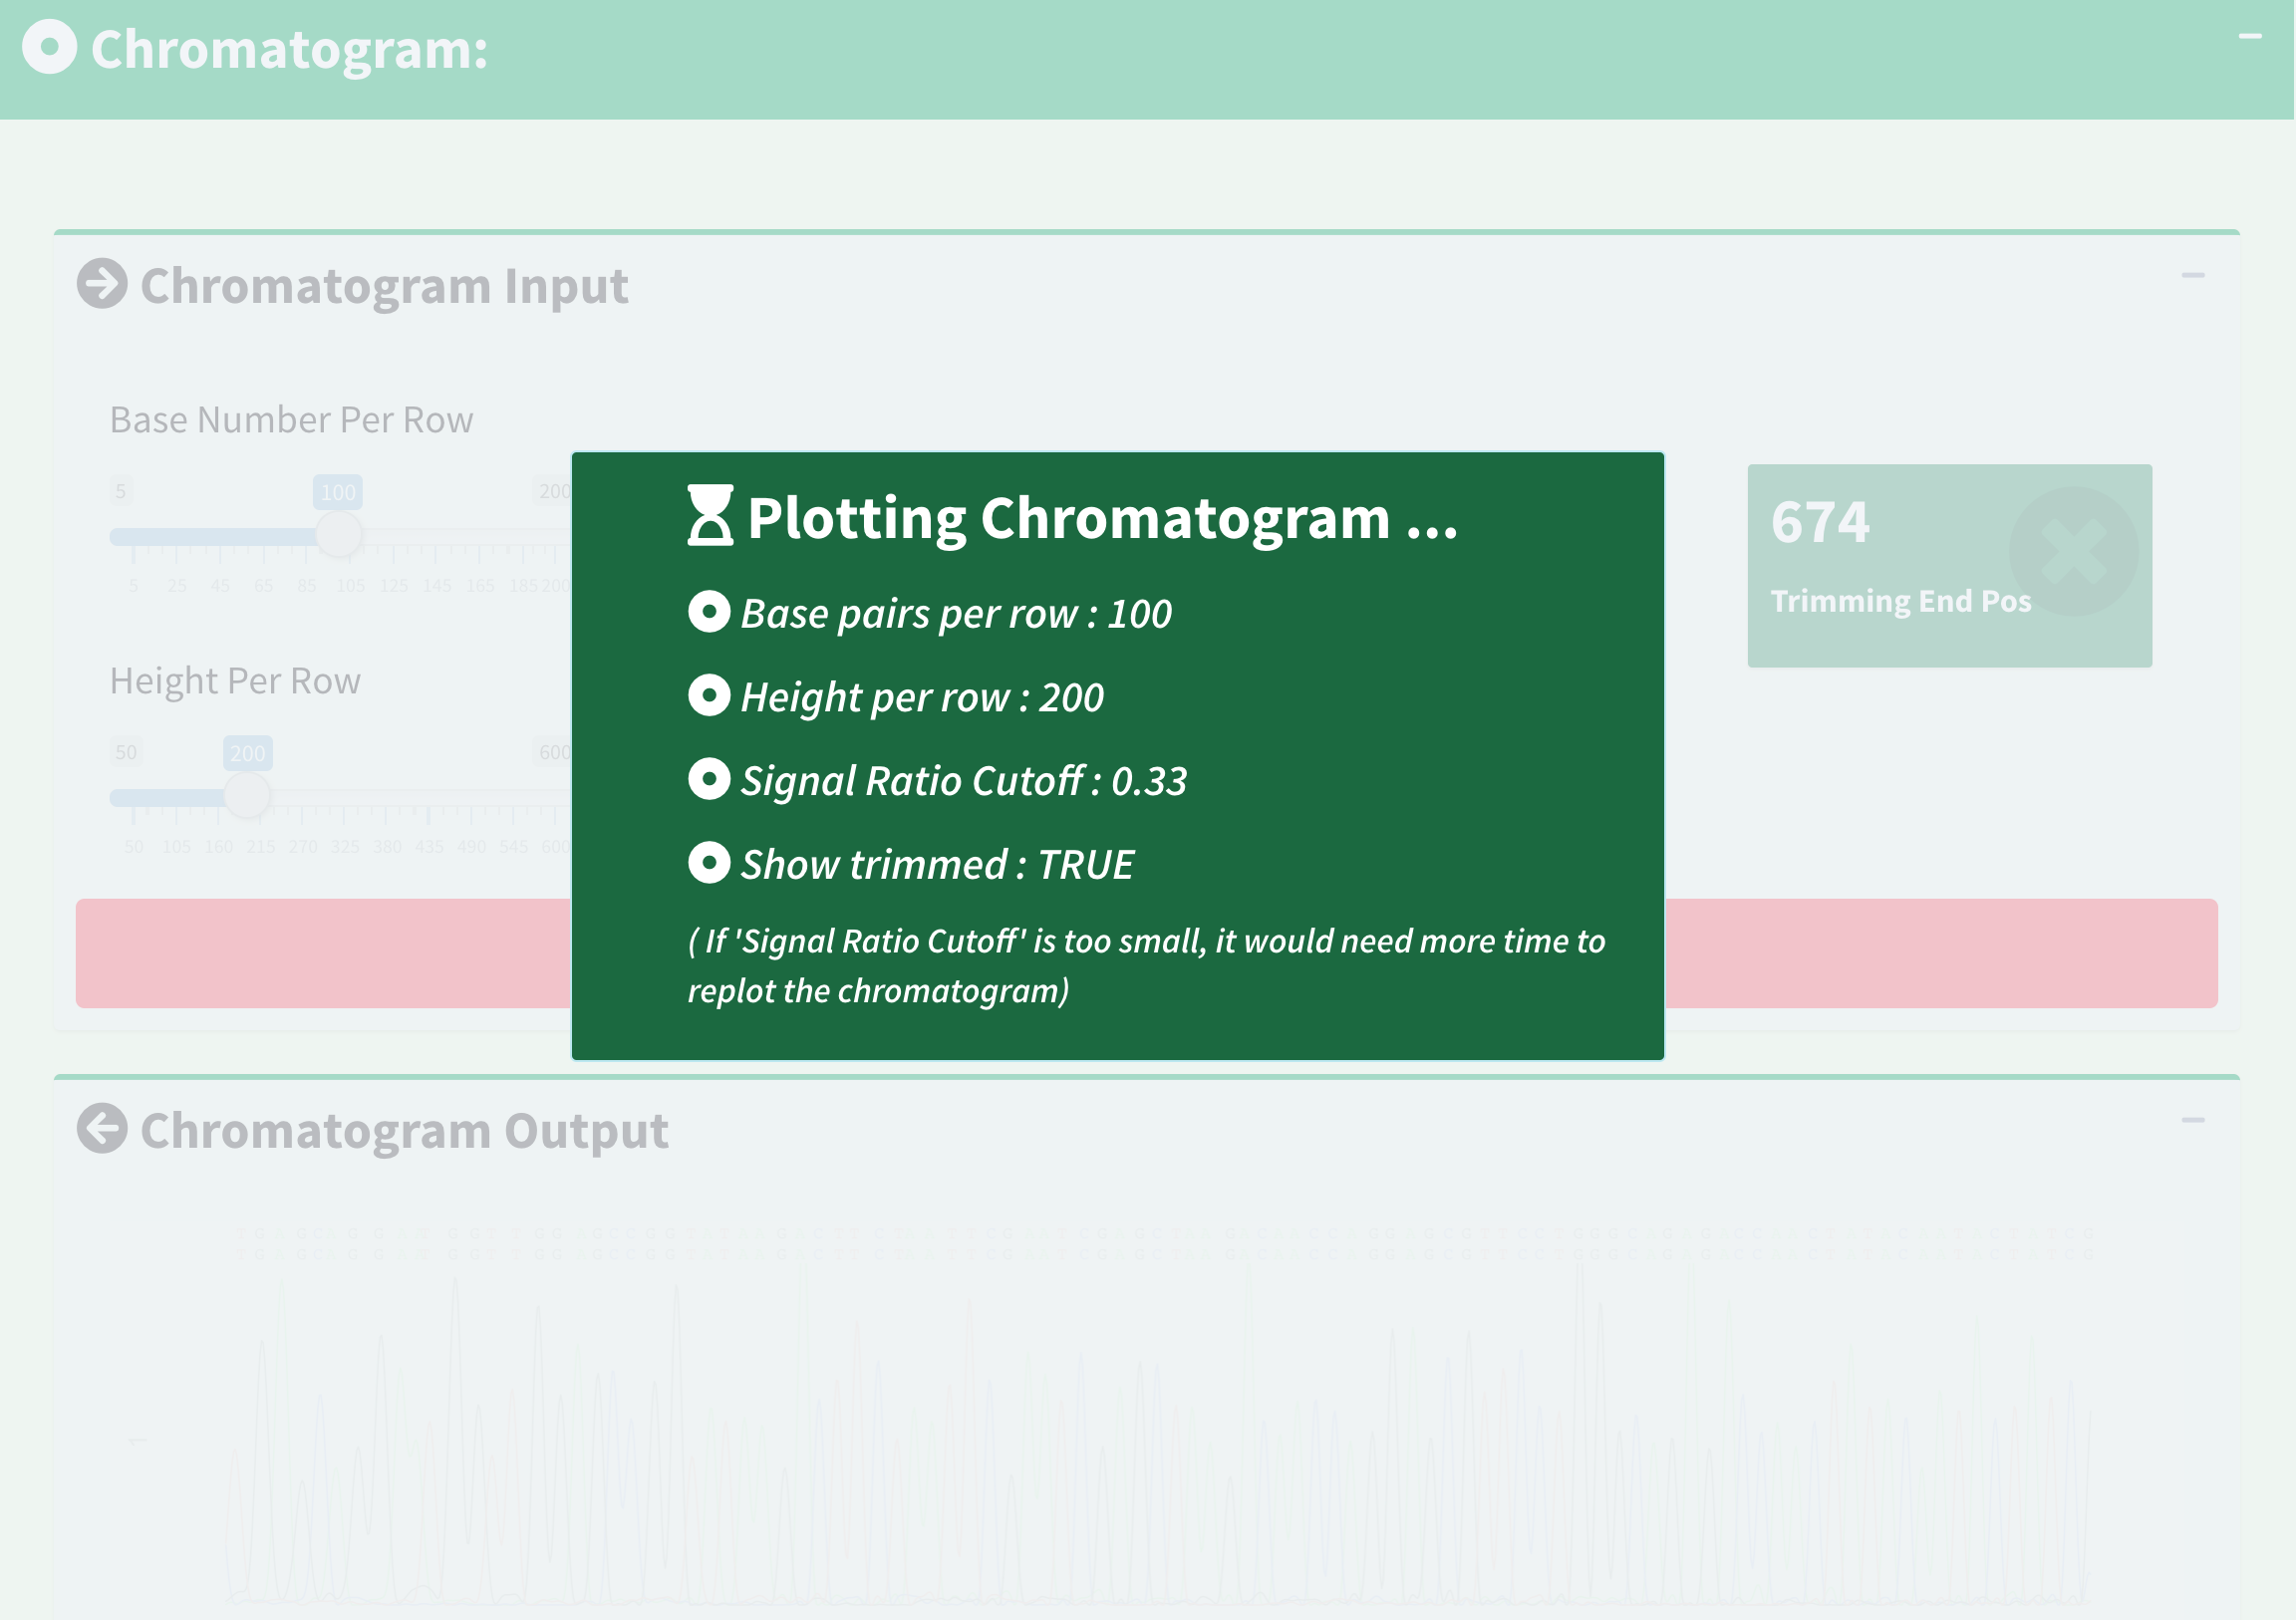
Figure 16. SangerContig page - loading notification popup during replotting chromatogram.
After replotting the chromatogram, we can see that trimmed region is showed in red striped region. Figure 17 shows part of the the chromatogram (1 bp ~ 240 bp). Moreover, chromatogram will be replotted when trimmed positions or chromatogram parameters are updated.
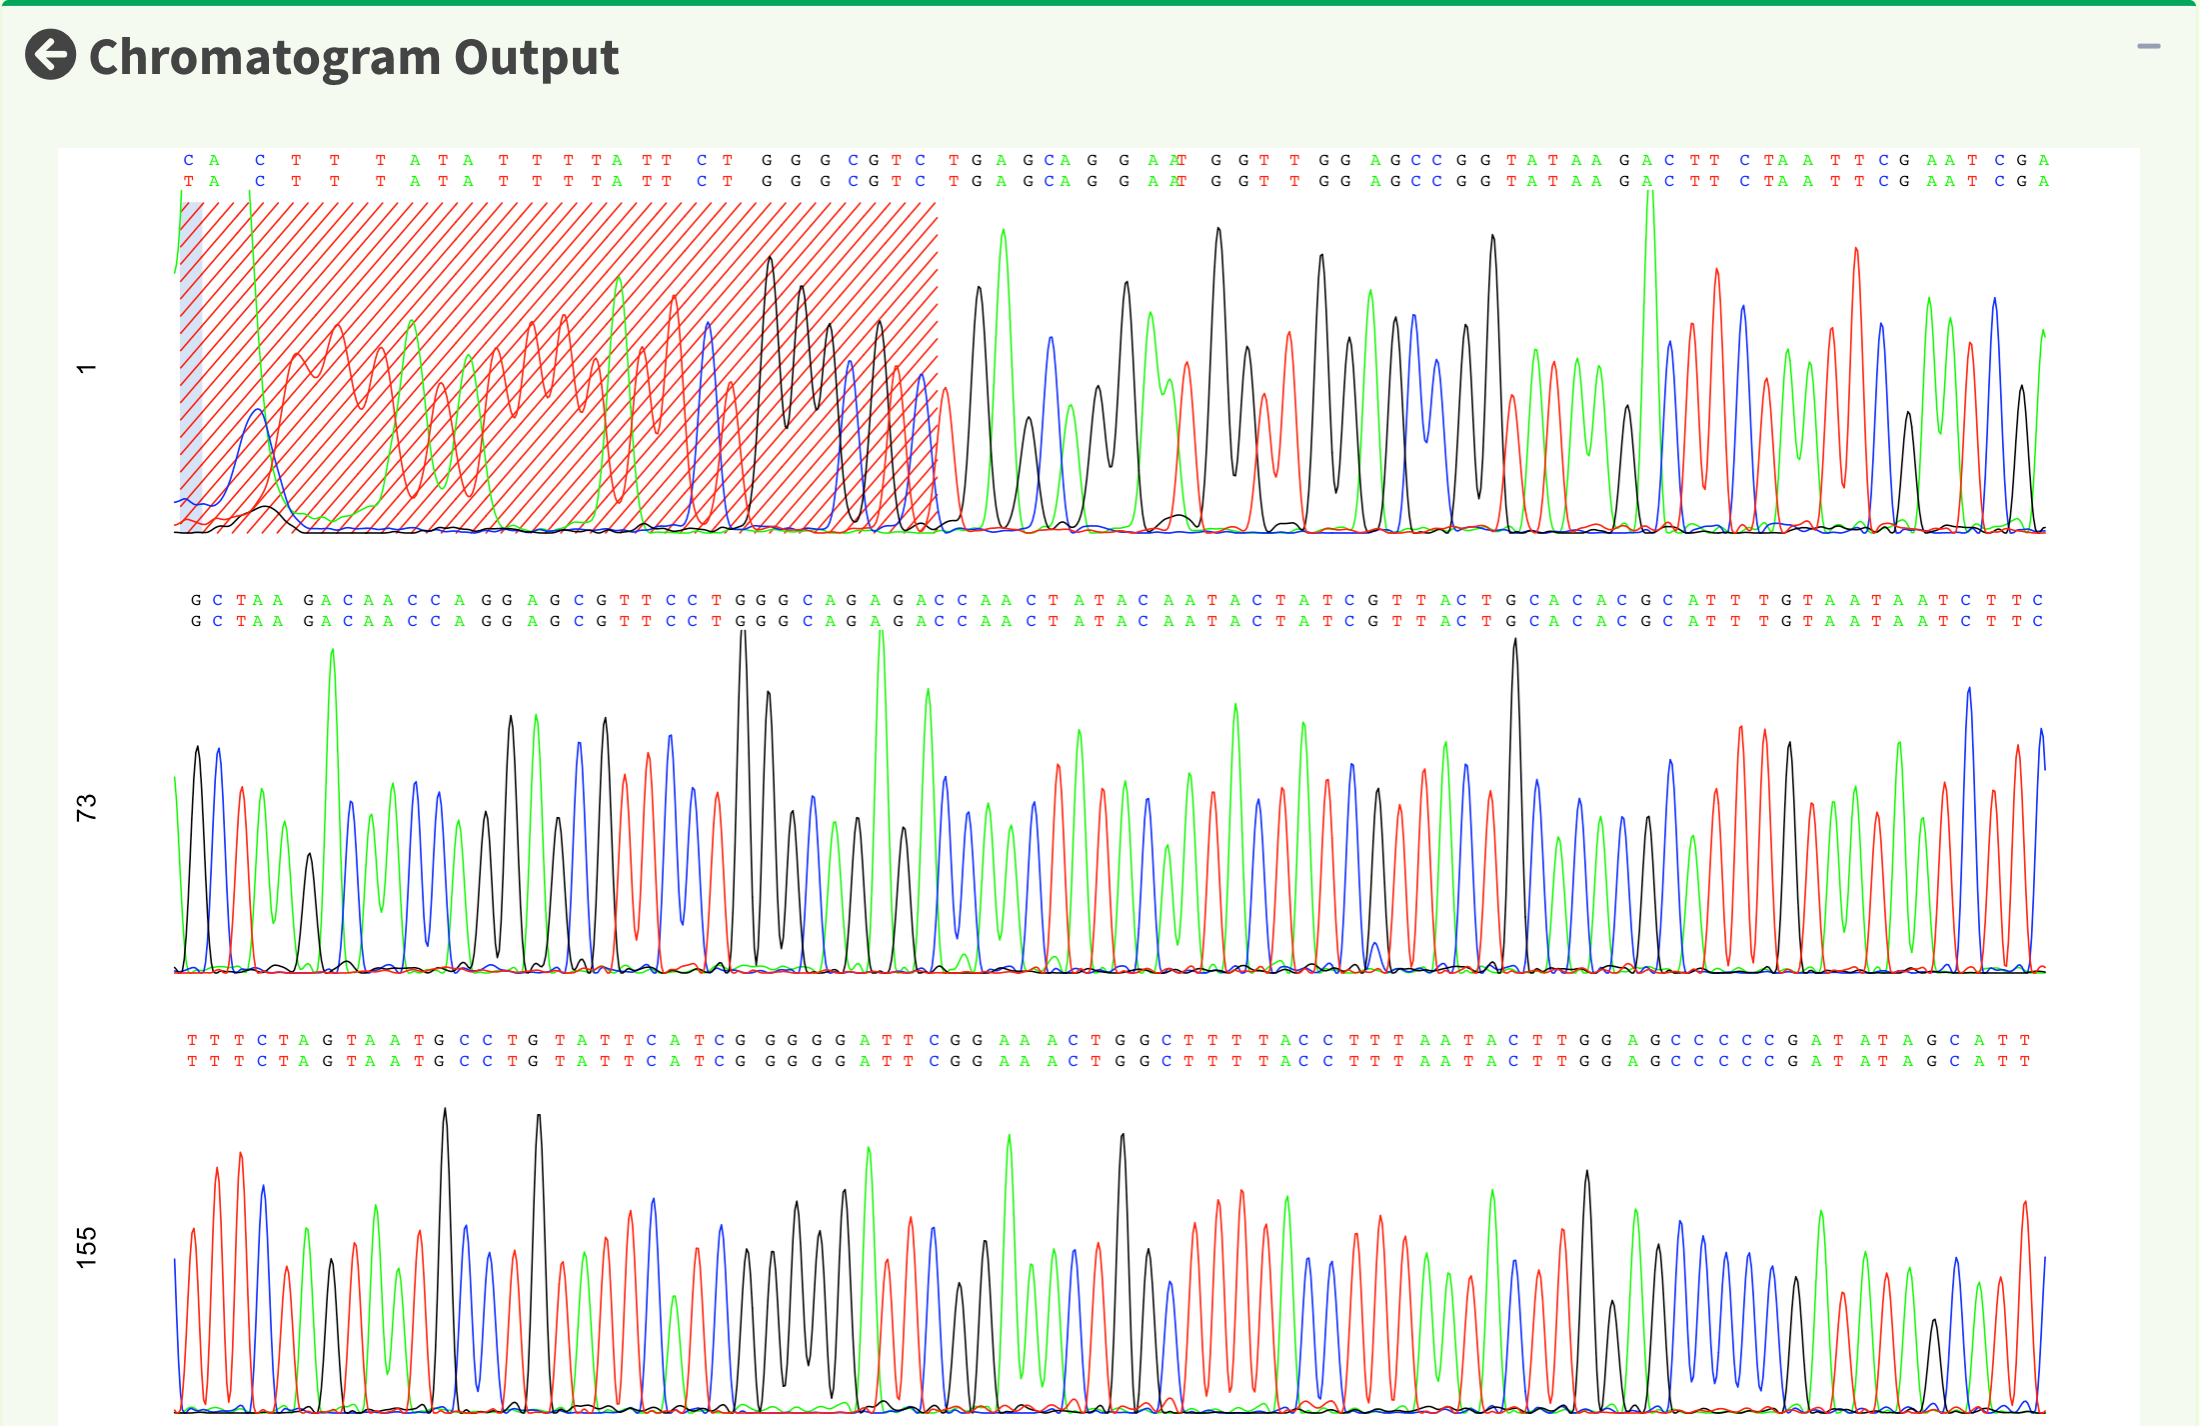
Figure 17. SangerContig page - chromatogram with trimmed region showed.
To let users browse the trimmed primary/secondary sequences without finding “Trimming Start Point” and “Trimming End Point” by themselves, we provide the final trimmed primary/secondary sequences that will be used for reads alignment with quality scores in table format in Figure 18. Frameshift amino acid sequences are also provided.
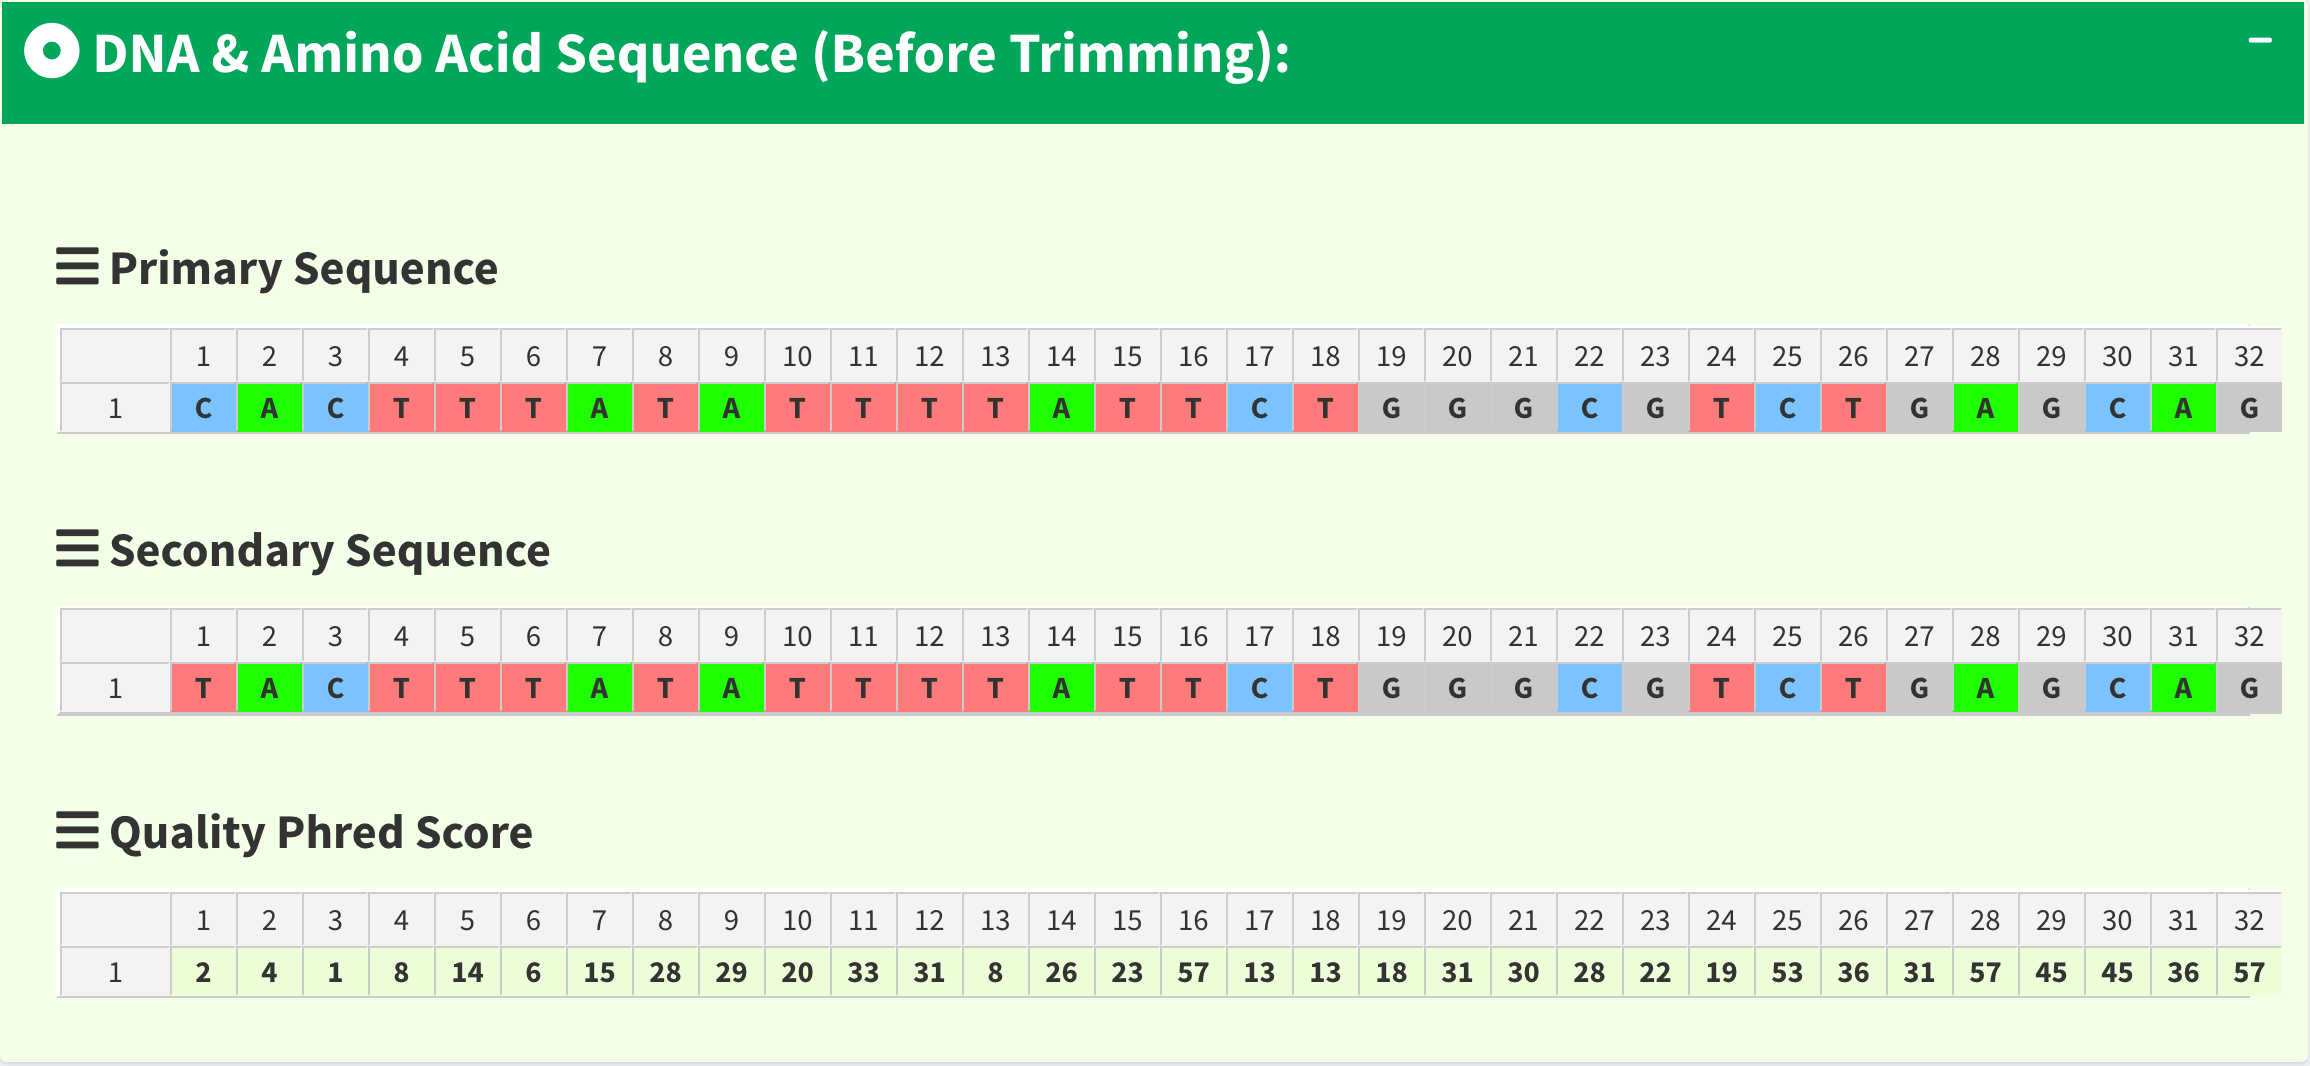
Figure 18. SangerContig page - trimmed primary/secondary sequences and Phred quality score in table format.
We have updated the trimming and chromatogram parameters for each read. Now, we need to click “Re-calculate contig” button to do alignment again. Last but not least, we can save all data into a new ‘SangerContig’ S4 instance by clicking “Save S4 Instance button”. New S4 instance will be saved in Rda format. Users can run readRDS function to load it into current R environment. Figure 19 shows some hints in the save notification popup.
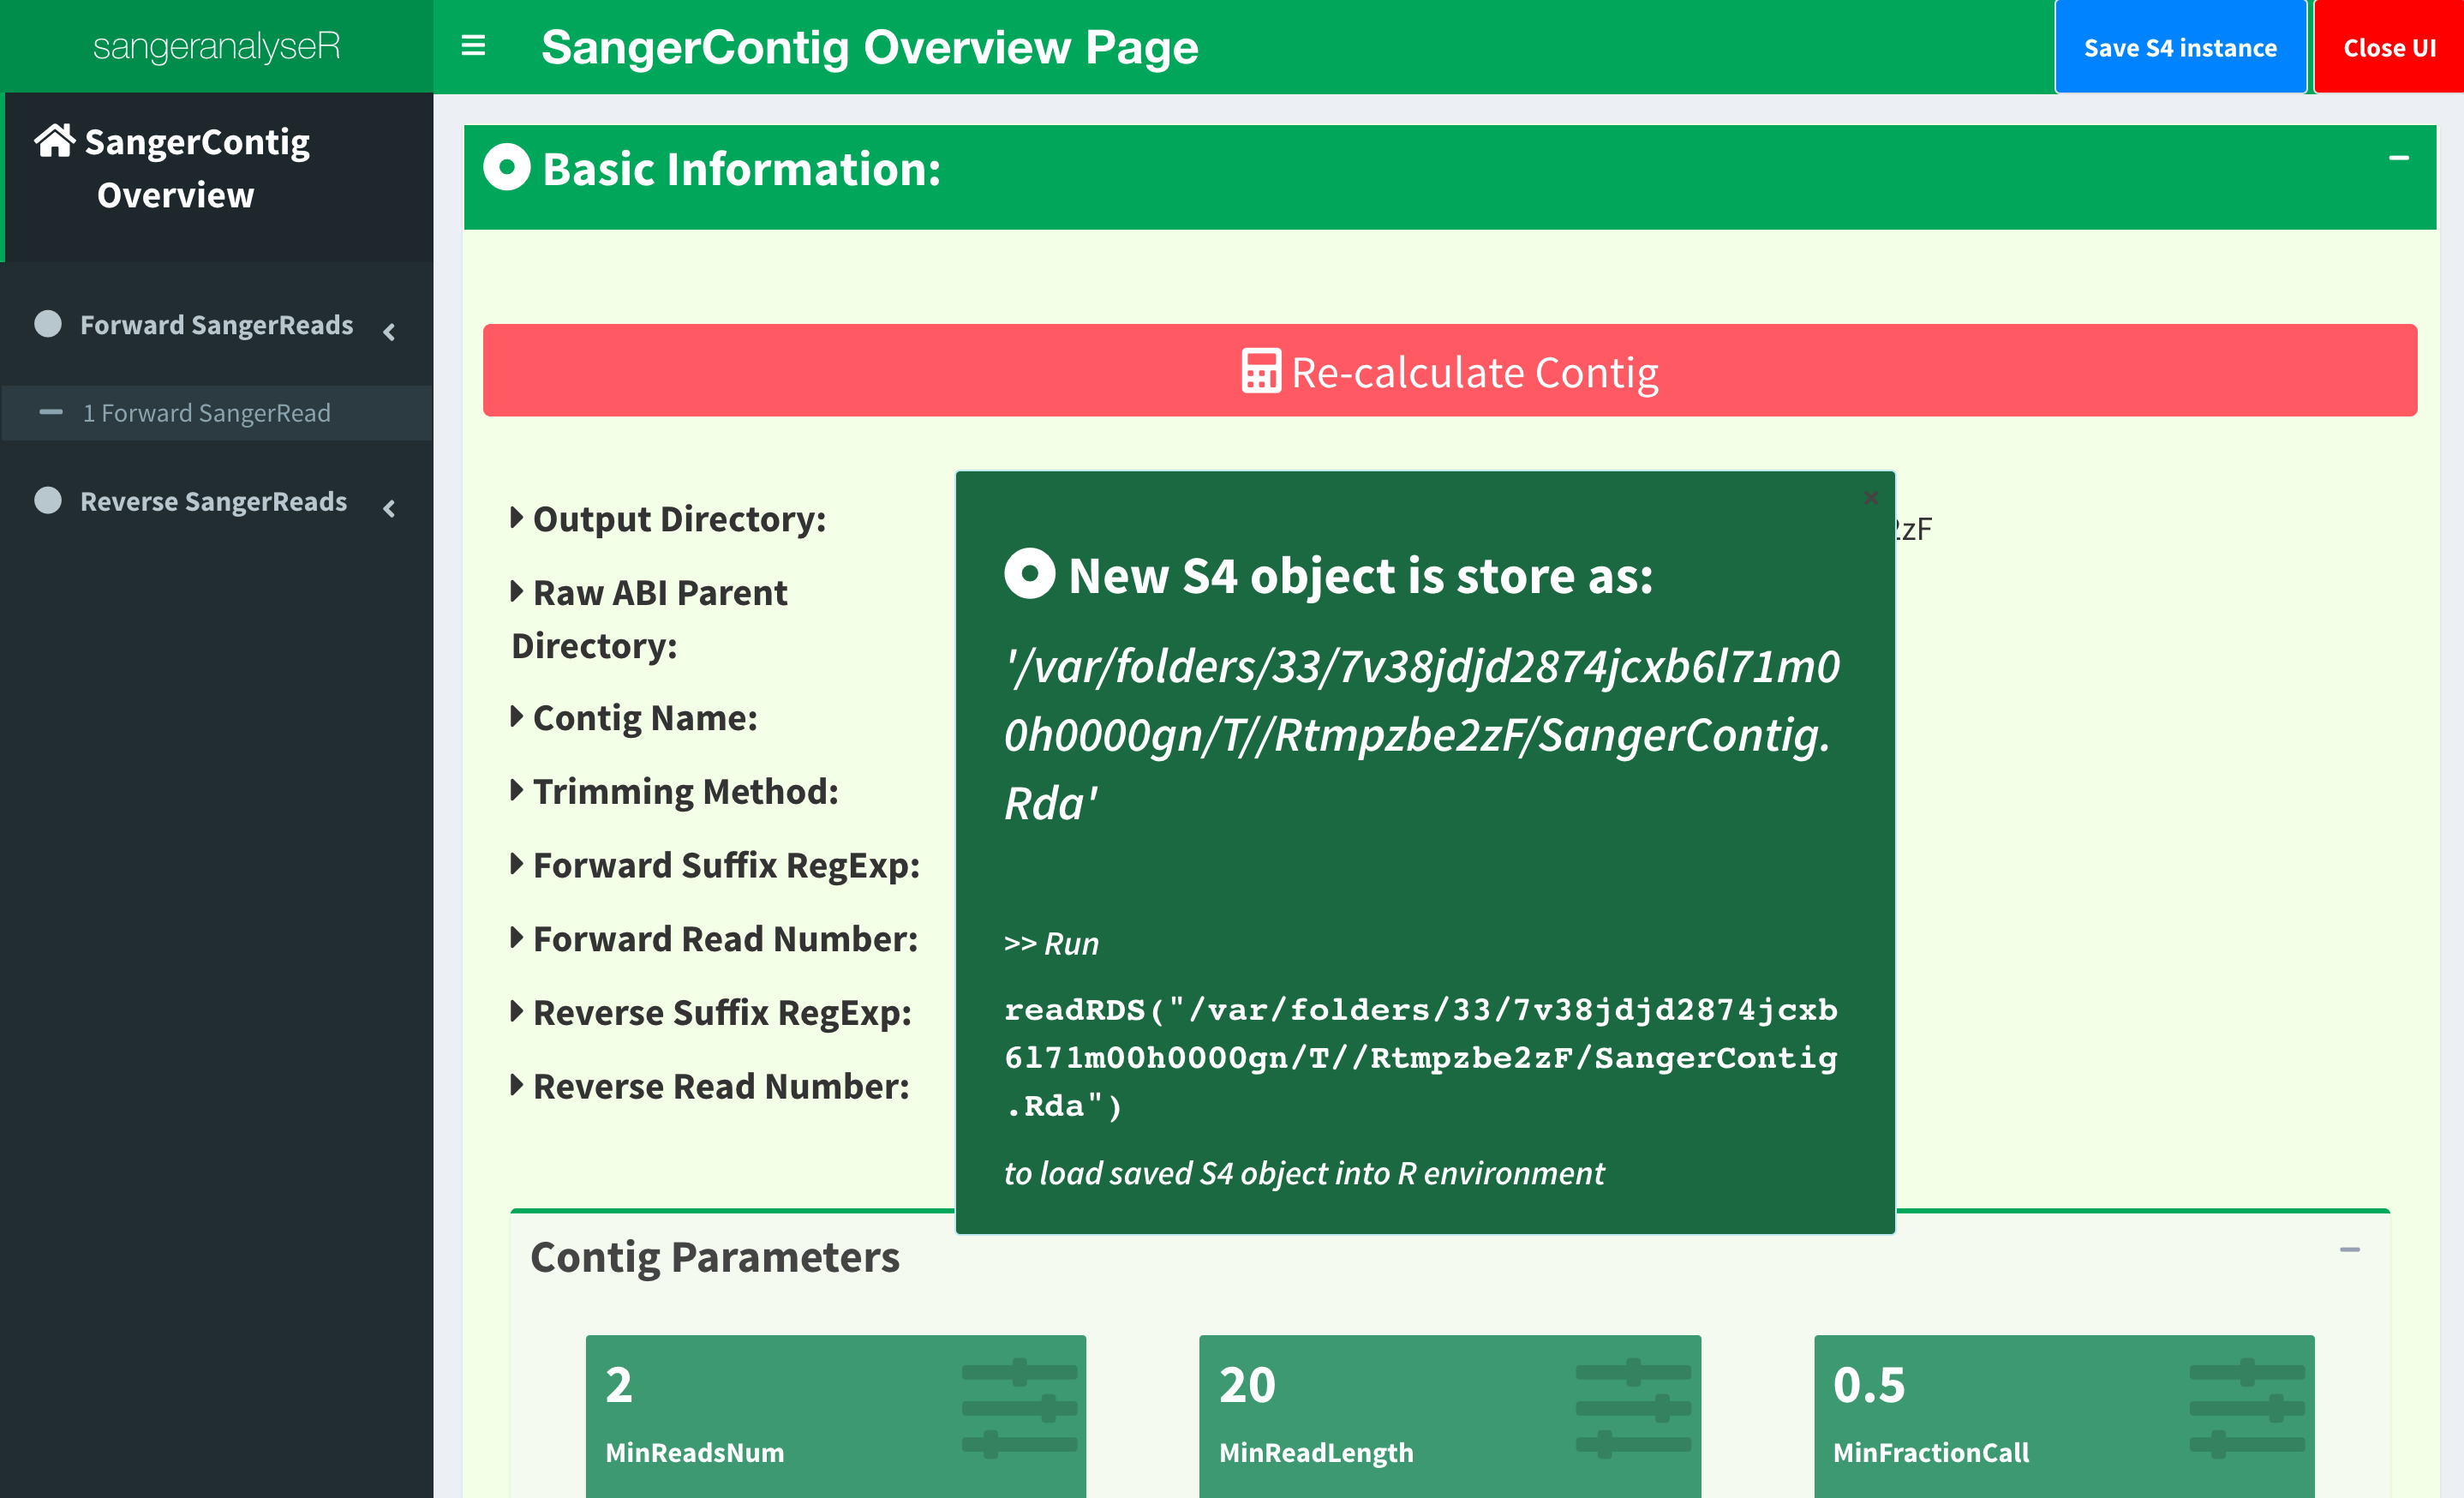
Figure 19. SangerContig page - saving notification popup.
Writing SangerContig FASTA files (AB1)
Users can write the SangerContig instance, my_sangerContig, to FASTA files. There are four options for users to choose from in selection parameter.
reads_unalignment: Writing reads into a single FASTA file (only trimmed without alignment).reads_alignment: Writing reads alignment and contig read to a single FASTA file.contig: Writing the contig to a single FASTA file.all: Writing reads, reads alignment, and the contig into three different files.
Below is the oneliner for writing out FASTA files. This function mainly depends on writeXStringSet function in Biostrings R package. Users can set the compression level through writeFasta function.
writeFasta(my_sangerContig,
           outputDir         = tempdir(),
           compress          = FALSE,
           compression_level = NA,
           selection         = "all")
Users can download the output FASTA file of this example through the following three links:
Achl_RBNII384-13_reads_unalignment.faAchl_RBNII384-13_reads_alignment.faAchl_RBNII384-13_contig.fa
Generating SangerContig report (AB1)
Last but not least, users can save SangerContig instance, my_sangerContig, into a report after the analysis. The report will be generated in HTML by knitting Rmd files.
Users can set includeSangerRead parameter to decide to which level the SangerContig report will go. Moreover, after the reports are generated,
users can easily navigate through reports in different levels within the HTML file.
One thing to pay attention to is that if users have many reads, it will take quite a long time to write out all reports. If users only want to generate the contig result, remember to set includeSangerRead to FALSE in order to save time.
generateReport(my_sangerContig,
               outputDir           = tempdir(),
               includeSangerRead   = TRUE)
Here is the generated SangerContig html report of this example (ABIF). Users can access to ‘Basic Information’, ‘SangerContig Input Parameters’, ‘Contig Sequence’ and ‘Contig Results’ sections inside it. Furthermore, users can also navigate through html reports of all forward and reverse SangerRead in this SangerContig report.
Code summary (SangerContig, AB1)
(1) Preparing SangerContig AB1 inputs
rawDataDir <- system.file("extdata", package = "sangeranalyseR")
parentDir <- file.path(rawDataDir, "Allolobophora_chlorotica", "RBNII")
(2) Creating SangerContig instance from AB1
(2.1) “Regular Expression Method” SangerContig creation (AB1)
# using `constructor` function to create SangerContig instance
my_sangerContig <- SangerContig(inputSource           = "ABIF",
                                processMethod         = "REGEX",
                                ABIF_Directory        = parentDir,
                                contigName            = "Achl_RBNII384-13",
                                REGEX_SuffixForward   = "_[0-9]*_F.ab1$",
                                REGEX_SuffixReverse   = "_[0-9]*_R.ab1$",
                                refAminoAcidSeq = "SRQWLFSTNHKDIGTLYFIFGAWAGMVGTSLSILIRAELGHPGALIGDDQIYNVIVTAHAFIMIFFMVMPIMIGGFGNWLVPLMLGAPDMAFPRMNNMSFWLLPPALSLLLVSSMVENGAGTGWTVYPPLSAGIAHGGASVDLAIFSLHLAGISSILGAVNFITTVINMRSTGISLDRMPLFVWSVVITALLLLLSLPVLAGAITMLLTDRNLNTSFFDPAGGGDPILYQHLFWFFGHPEVYILILPGFGMISHIISQESGKKETFGSLGMIYAMLAIGLLGFIVWAHHMFTVGMDVDTRAYFTSATMIIAVPTGIKIFSWLATLHGTQLSYSPAILWALGFVFLFTVGGLTGVVLANSSVDIILHDTYYVVAHFHYVLSMGAVFAIMAGFIHWYPLFTGLTLNNKWLKSHFIIMFIGVNLTFFPQHFLGLAGMPRRYSDYPDAYTTWNIVSTIGSTISLLGILFFFFIIWESLVSQRQVIYPIQLNSSIEWYQNTPPAEHSYSELPLLTN")

# using `new` method to create SangerContig instance
my_sangerContig <- new("SangerContig",
                       inputSource           = "ABIF",
                       processMethod         = "REGEX",
                       ABIF_Directory        = parentDir,
                       contigName            = "Achl_RBNII384-13",
                       REGEX_SuffixForward   = "_[0-9]*_F.ab1$",
                       REGEX_SuffixReverse   = "_[0-9]*_R.ab1$",
                       refAminoAcidSeq = "SRQWLFSTNHKDIGTLYFIFGAWAGMVGTSLSILIRAELGHPGALIGDDQIYNVIVTAHAFIMIFFMVMPIMIGGFGNWLVPLMLGAPDMAFPRMNNMSFWLLPPALSLLLVSSMVENGAGTGWTVYPPLSAGIAHGGASVDLAIFSLHLAGISSILGAVNFITTVINMRSTGISLDRMPLFVWSVVITALLLLLSLPVLAGAITMLLTDRNLNTSFFDPAGGGDPILYQHLFWFFGHPEVYILILPGFGMISHIISQESGKKETFGSLGMIYAMLAIGLLGFIVWAHHMFTVGMDVDTRAYFTSATMIIAVPTGIKIFSWLATLHGTQLSYSPAILWALGFVFLFTVGGLTGVVLANSSVDIILHDTYYVVAHFHYVLSMGAVFAIMAGFIHWYPLFTGLTLNNKWLKSHFIIMFIGVNLTFFPQHFLGLAGMPRRYSDYPDAYTTWNIVSTIGSTISLLGILFFFFIIWESLVSQRQVIYPIQLNSSIEWYQNTPPAEHSYSELPLLTN")
(2.2) “CSV file matching” SangerContig creation (AB1)
csv_namesConversion <- file.path(rawDataDir, "ab1", "SangerContig", "names_conversion_2.csv")

# using `constructor` function to create SangerContig instance
my_sangerContig <- SangerContig(inputSource           = "ABIF",
                                processMethod         = "CSV",
                                ABIF_Directory        = parentDir,
                                contigName            = "Achl_RBNII384-13",
                                CSV_NamesConversion   = csv_namesConversion,
                                refAminoAcidSeq = "SRQWLFSTNHKDIGTLYFIFGAWAGMVGTSLSILIRAELGHPGALIGDDQIYNVIVTAHAFIMIFFMVMPIMIGGFGNWLVPLMLGAPDMAFPRMNNMSFWLLPPALSLLLVSSMVENGAGTGWTVYPPLSAGIAHGGASVDLAIFSLHLAGISSILGAVNFITTVINMRSTGISLDRMPLFVWSVVITALLLLLSLPVLAGAITMLLTDRNLNTSFFDPAGGGDPILYQHLFWFFGHPEVYILILPGFGMISHIISQESGKKETFGSLGMIYAMLAIGLLGFIVWAHHMFTVGMDVDTRAYFTSATMIIAVPTGIKIFSWLATLHGTQLSYSPAILWALGFVFLFTVGGLTGVVLANSSVDIILHDTYYVVAHFHYVLSMGAVFAIMAGFIHWYPLFTGLTLNNKWLKSHFIIMFIGVNLTFFPQHFLGLAGMPRRYSDYPDAYTTWNIVSTIGSTISLLGILFFFFIIWESLVSQRQVIYPIQLNSSIEWYQNTPPAEHSYSELPLLTN")


# using `new` method to create SangerContig instance
my_sangerContig <- new("SangerContig",
                       inputSource           = "ABIF",
                       processMethod         = "CSV",
                       ABIF_Directory        = parentDir,
                       contigName            = "Achl_RBNII384-13",
                       CSV_NamesConversion   = csv_namesConversion,
                       refAminoAcidSeq = "SRQWLFSTNHKDIGTLYFIFGAWAGMVGTSLSILIRAELGHPGALIGDDQIYNVIVTAHAFIMIFFMVMPIMIGGFGNWLVPLMLGAPDMAFPRMNNMSFWLLPPALSLLLVSSMVENGAGTGWTVYPPLSAGIAHGGASVDLAIFSLHLAGISSILGAVNFITTVINMRSTGISLDRMPLFVWSVVITALLLLLSLPVLAGAITMLLTDRNLNTSFFDPAGGGDPILYQHLFWFFGHPEVYILILPGFGMISHIISQESGKKETFGSLGMIYAMLAIGLLGFIVWAHHMFTVGMDVDTRAYFTSATMIIAVPTGIKIFSWLATLHGTQLSYSPAILWALGFVFLFTVGGLTGVVLANSSVDIILHDTYYVVAHFHYVLSMGAVFAIMAGFIHWYPLFTGLTLNNKWLKSHFIIMFIGVNLTFFPQHFLGLAGMPRRYSDYPDAYTTWNIVSTIGSTISLLGILFFFFIIWESLVSQRQVIYPIQLNSSIEWYQNTPPAEHSYSELPLLTN")
(3) Updating SangerContig quality trimming parameters
newSangerContig <- updateQualityParam(my_sangerContig,
                                      TrimmingMethod       = "M2",
                                      M1TrimmingCutoff     = NULL,
                                      M2CutoffQualityScore = 20,
                                      M2SlidingWindowSize  = 15)
(5) Writing SangerContig FASTA files (AB1)
writeFasta(my_sangerContig)
You will get three FASTA files:
Achl_RBNII384-13_reads_unalignment.faAchl_RBNII384-13_reads_alignment.faAchl_RBNII384-13_contig.fa
(6) Generating SangerContig report (AB1)
generateReport(my_sangerContig)
You can check the html report of this SangerContig example (ABIF).